Category Archives: Virtualization

Lessons learned with Docker, Nodejs apps and volumes

Context

I have kept playing with Docker recently, just for fun and to learn.

It is very powerful, but still young. It quickly shows some limit when it comes to security or persistence. There are some workarounds, yet more or less complex, more or less hacky.

Indeed, I had some issues with Etherpad, which is a Nodejs application, and its integration into Docker.

Initially, I made something quite simple, so my Dockerfile ended like that:

USER etherpad
CMD ["node","/opt/etherpad-lite/node_modules/ep_etherpad-lite/node/server.js"]

Thus, I simply start the app with a low privileges user.

It worked, but I had two issues:

  1. Docker was not able to stop it nicely. Instead, it timed out after 10 sec and finally killed the app and the container altogether.
  2. No persistence of any kind, of course.

I decided to tackle these two issues to understand what was going on behind.

The PID 1 issue

I could not understand immediately the first issue: why was Docker unable to terminate the container properly?

After wandering a few hours on wrong paths (trying to get through with Nodejs nodemon or supervisor), I finally found some good articles, explaining that Docker misses an init system to catch signals, wich causes some issues with applications started with a PID = 1, which cannot be killed, or with Bash (the shell doesn’t handle transmitted signals.

I am not going to repeat poorly what has already been explained very well, so I encourage you to read this two excellent posts:

You will also find a lot of bug reports in the Docker github about this issue, and a lot of hacky or overkilling solutions.

In my opinion, the most elegant solution among them is to use a launcher program, very simple and dedicated to catch and handle signal.

I chose to use Dumb-init, as it is well packaged (there are plenty of options) and seems to be well maintained.

So, after installing Dump-init in the Dockerfile, the CMD line should now look like this:

USER etherpad
CMD ["dumb-init","node","/opt/etherpad-lite/node_modules/ep_etherpad-lite/node/server.js"]

And indeed, as expected, docker stop now works flawlessly.

Volume permissions

This is where I had the toughest issue, although it is supposed to be straightforward with volumes.

Volumes enable to share files or folders between host and containers, or between containers solely. There are plenty of possibilities, nicely illustrated on this blog:

And it works very well…. as long as you application runs as root.

In my case, for instance, Etherpad runs with a low privileged user, which is highly recommended. At startup, it creates a sqlite database, etherpad.db,  in its ./var folder.

Mounting a volume, of any kind, over the ./var folder, would result in a folder with root only permissions. Subsequently, of course, the launch of Etherpad from the CMD command would fail miserably.

Simple solutions like chown in the Dockerfile don’t work, because they apply before the mount. The mount occurs at runtime and works like a standard Linux mount: it is created by the docker daemon, with root permissions, over possibly existing data.

My solution was to completely change the way Etherpad is started. I now use an external script which is started at runtime:

  1. First, it applies the appropriate permissions to the mounted volume with chown,
  2. Then, it starts Etherpad with a low privileged user thanks to a su hack.

So now the Dockerfile ends with:

VOLUME /opt/etherpad-lite/var
ADD run-docker.sh ./bin/
CMD ["./bin/run-docker.sh"]

And here is the script:

#!/bin/bash

chown -R etherpad:etherpad /opt/etherpad-lite/var
su etherpad -s /bin/bash -c  "dumb-init node /opt/etherpad-lite/node_modules/ep_etherpad-lite/no
de/server.js"

I use a data volume for persistency, so the run command looks like this:

docker run -d --name etherpad -p 80:9001 -v etherpad:/opt/etherpad-lite/var -t debian-etherpad

Far from being ideal, but it works. I really hope some features are coming to bring more options in this area, especially in the Dockerfile.

Some final thoughts

Globally, we can still hope a lot of improvements in security, because when I look at many Dockerfiles around, I see two behaviors:

  • A lot of people don’t care and everything is happily running as root, from unauthenticated third-party images or binaries…
  • Some people do care but end up with dirty hacks, because there is no other way to do so.

It is scary and so far from the Linux philosophy. Let’s wait for the enhancements to come.

You can find the complete updated Dockerfile on this github page.

While we are on this topic, have a look to this nice post with some nice tips and tricks for Docker.
A few (convenient) dockerfiles

I just put on my github a few dockerfiles for virtual machines that I frequently use to get some quick work done or to temporary share some data.

Here they are:

I used to use VirtualBox guests, but maintaining them was a hassle (updates, snapshots, disk defragmation and shrinking, etc.).

It makes perfect sense to use Docker just for that, and on top of that it consumes much fewer resources. Starting with the disk usage : all these containers along with their image stands below 1 GB!

The fact that I am using Btrfs as the underlying storage driver is not for nothing: compression is extremely efficient on images!

Note that my Dockerfiles have nothing special, you can actually find others on the Internet (and I was inspired by some).

There are a few differences, however:

  • I care much about security, so at least I try to make Web services not running as root, even if it is inside a container (the root user is still the same as on the host, so let’s make a compromise as unlikely as possible).
  • I like simple things, so I tried to keep everything straightforward and simplified some stuff.
  • I don’t like to waste disk space. So when I some Dockerfiles based on Ubuntu, Debian Wheezy, Debian Jessie, Fedora, etc., I try to unify all of them under Debian “stable” (so as of today, Jessie). Why bother with useless images? I chose a versatile and common server distribution and I am trying to stick with it.

While I was playing, I had two things bothering me:

  • No quota support: for a Samba sharing guest that I have, I would have liked to implement quotas from within the container. There is no support for that at the moment, and the global limitation by container is not nice (and once you choose a big size, you can’t go backward for existing containers…). I have a dedicated partition for Docker, so, while not perfect, it is okay for now.
  • The devicemapper storage driver totally sucks at this time: free space is never reclaimed after you delete images or containers! So the more you use Docker, the more your partition gets full.

A journey with Btrfs

Why BTRFS ?

I have recently tested Btrfs as the file system for my /home partition (which was previously on ext4).

I have been impressed by what this file system enables to do, but also came to the conclusion that it is not for me.

As a quick reminder, the goal of this file system is to bring to Linux a fully featured file system similar to zfs. Some of these features promise a lot of awesomeness: snapshots, native RAID, automatic defragmentation and repairs, etc.

Wouldn’t it be cool to have such a file system for your data? Among them, snapshotting really is a killer feature. See it as a global git for all your data. You can track any file history, make a diff comparison on them and revert back to a chosen version, anytime and on-line.

Btrfs has been under development for a while and it is still undergoing. However, the first stable version has finally been released last year.

Many people warn that it is not production ready yet. It seems obvious for critical production systems, under heavy load or using the most advanced features (e.g. RAID). But what about a simple /home, mainly using snapshots (which have been around for a while)?

You will see that there are still some issues with virtualization.

Disclaimer 1: this is in no way a review or a benchmark of Btrfs. Consider it simply as some feedback for my specific use case.

Getting ready

This chapter is a summary of procedures found in various resources, along with my feedback.

Disclaimer 2: First of all, make several backup of your entire /home. And make sure that it is operational and complete. Anyway, beware that there is obviously some inherent risk for your data in manipulating your home partition. So, do not come back to insult me if you lose any data.

First, note that there is a conversion utility btrfs-convert, to convert an existing ext4 partition to btrfs. While this sounds cool, it did not work well with my partition, leading to many corrupted inodes.

So my advice is to just make a good backup of your home:

% rsync -av /home /your/backup/

Then, log out and format the partition as root:

# mount | grep home
/dev/mapper/system-home on /home type ext4 (rw,noatime,data=ordered)
# umount /home
# mkfs.btrfs /dev/mapper/system-home

Change the file system and its options in /etc/fstab. For example:

/dev/system/home     /home     ext4     defaults,noatime     1 1

should become (also note the change on the last digit):

/dev/system/home   /home    btrfs  defaults,noatime,ssd,space_cache,compress=lzo    1 0

Re-mount /home and you are done!

Snapper

The main purpose for me to test Btrfs was the snapshot feature, in the hope to keep a version history of each file and avoid accidental deletions and changes.

Of course, one could use the Btrfs commands and implement snapshots manually. But why reinventing the wheel?

The guys behind snapper  already made a service especially for that. It is basically a wrapper over Btrfs that will make automatic snapshots in the background, based on your frequency settings, and ease their handling.

Once installed, it can be enabled with the following command:

# snapper -c home create-config /home

It has the effect of creating a configuration file, where you can adjust the number of snapshots you want to keep per day, week, month, etc. Of course, don’t keep too much data as it will waste free space, especially if you happen to move large amounts of data. Hourly and daily snapshots are OK, as they would be cleaned up quickly. But monthly or yearly snapshots would consume a lot of space and would be pretty useless for a /home.

Here is what I used, without consuming much more than 10 GB:

# subvolume to snapshot
SUBVOLUME="/home"

# filesystem type
FSTYPE="btrfs"

# users and groups allowed to work with config
ALLOW_USERS=""
ALLOW_GROUPS="

# sync users and groups from ALLOW_USERS and ALLOW_GROUPS to .snapshots
# directory
SYNC_ACL="no"

# start comparing pre- and post-snapshot in background after creating
# post-snapshot
BACKGROUND_COMPARISON="yes"

# run daily number cleanup
NUMBER_CLEANUP="yes"

# limit for number cleanup
NUMBER_MIN_AGE="1800"
NUMBER_LIMIT="10"
NUMBER_LIMIT_IMPORTANT="5"

# create hourly snapshots
TIMELINE_CREATE="yes"

# cleanup hourly snapshots after some time
TIMELINE_CLEANUP="yes"

# limits for timeline cleanup
TIMELINE_MIN_AGE="1800"
TIMELINE_LIMIT_HOURLY="10"
TIMELINE_LIMIT_DAILY="7"
TIMELINE_LIMIT_WEEKLY="2"
TIMELINE_LIMIT_MONTHLY="0"
TIMELINE_LIMIT_YEARLY="0"

# cleanup empty pre-post-pairs
EMPTY_PRE_POST_CLEANUP="yes"

# limits for empty pre-post-pair cleanup
EMPTY_PRE_POST_MIN_AGE="1800"

Now, let’s play a little. In the following sequence, we create a file containing “Hello World!”, we then create a manual snapshot, change the file and display the differences:

# vim test.txt
# snapper -c home create --description "before test"
# vim test.txt
# sudo snapper -c home list
Type   | # | Pre # | Date                     | User | Cleanup  | Description  | Userdata
-------+---+-------+--------------------------+------+----------+--------------+---------
single | 0 |       |                          | root |          | current      | 
single | 1 |       | Sun Mar 13 19:44:21 2016 | root |          | before test  | 
single | 2 |       | Sun Mar 13 19:45:12 2016 | root |          | created test | 
single | 3 |       | Sun Mar 13 19:52:39 2016 | root |          | update test  | 
single | 4 |       | Sun Mar 13 20:00:01 2016 | root | timeline | timeline     | 
single | 5 |       | Sun Mar 13 21:00:01 2016 | root | timeline | timeline     | 
single | 6 |       | Sun Mar 13 22:00:01 2016 | root | timeline | timeline     | 
# snapper -c home status 1..0
--- "/home/.snapshots/2/snapshot/phocean/test.txt" 2016-03-13 19:44:53.370641373 +0100
+++ "/home/phocean/test.txt" 2016-03-13 19:45:27.226586459 +0100
@@ -1 +1,2 @@
Hell World!
+Good bye.
@@ -0,0 +1,2 @@
+Hell World!
+Good bye

Neat, isn’t it? Now, what if we decide to restore the file to this snapshot:

snapper -c home undochange 1..0 /home/phocean/test.txt

That’s it!

Note that all these operations can be done against the entire partition (no argument needed), a folder or a file.

Pros

Regarding regular files, I had no issue at all. After a week of intensive use, I already the occasion to enjoy the benefits of having snapshots and being able to restore a file.

On the performance side, even though I haven’t done any benchmark, it is a least as fast as ext4. It is said that under some conditions, compression can be a big read rate boost.

On the compression side, on my partition of 400 GB, it allowed me to reclaim around 20 GB of space. Of course, the gain you can expect is totally related to the sorts of files you have (you won’t gain much on files that are already compressed or encrypted).

Cons

As warned on the official wiki itself, you should not use Btrfs as-is with database or virtualization solutions.

Dixit the official wiki:

Files with a lot of random writes can become heavily fragmented (10000+ extents) causing trashing on HDDs and excessive multi-second spikes of CPU load on systems with an SSD or large amount a RAM.

Indeed, I quickly experienced some issues with Virtualbox. Under heavy I/O operations, and having several machines running at a time, I had the guest file systems corrupted more than once. And so badly that the guest machine was unrecoverable (even with snapshots). Sometimes I got plenty of ext4 errors, or sometimes it just froze, while copying a bunch of file or doing an apt-get upgrade...

The workarounds did not make it for me:

  1. I even did not test disabling CoW for the whole partition. It kills one of the main advantages of using Btrfs.
  2. I tried disabling CoW for all the VM folder. While the corruption frequency decreased, it still occurred after a while.

So, I would simply adivse of not putting any virtual machine on the Btrfs partitions, until this thing definitely get sorted. I use virtual machines intensively at work and need them to be reliable.

Conclusion

Btrfs is awesome and pretty stable at this time, unless you need to host virtual machines. You could still have a dedicate ext4 partition for you VMs, and enjoy Btrfs for the rest of your home.

To be honest, I did not bother (not wanting to manage several partitions), and switched back to ext4 for all, in the expectation of better days. I am not sure if this should be addressed on the Btrfs, or the Virtualbox side (or both).

References

My goodness, I got mainframed!

Mainframes are not dead, why not pentesting it?

I just watched the presentation of Phil Young at Shmoocon 2013: “Mainframed: the secrets inside that black box“. I truly loved it. I thought mainframes where disappearing, but I was surprised to see that it still alive. I was even more surprised to find out that they have some Unix interface, and that there is a emulator for x86. Where it was less of a surprise is that their security is pretty low :-)

Anyway, don’t miss watching the video. Phil’s blog, “Soldier of Fortran”, is also a gold mine, he wrote many tips, tutos and tools.

It made me very curious and just in case I find some IBM Z/OS during a pentest, I though it would be nice to run it.

Installing

Disclaimer:

Although some Z/OS files are available for download on the Internet, you must own a legal license of Z/OS. This tutorial is exclusively for education-purpose, use it only for testing, never in production nor for illegal activities.

Also, I am a noob in the area. So if some of you are skilled and find mistakes or improvements, please let me know in the comments. I give a great importance to your feedback and it encourages me to continue.

I glued the pieces in the following steps (Mac OS oriented and tested only with it, the same should work for Linux with minor adjustments and see the reference otherwise):

  1. Download and install tn3270 (Mac) or x3270 (Windows, Linux, Mac): this will be the client terminal used to connect to the mainframe.
  2. Download the emulator, Hercules. Install it, following the README instructions relevant to your system. Note that the instructions for Mac OS are outdated and won’t work. I followed Phil’s instructions:
git clone git://github.com/s390guy/hercules-390.git
cd hercules-390
sh autogen.sh
./configure
make
make install
  1. Take some IBM Z/OS release, and install it:
mv IBM\ ZOS\ 1.10/Z110SA/images/Z110\ -\ Copy /YOUR/PATH/HERE/Z110
cd /YOUR/PATH/HERE/Z110
mkdir PRTR
cd CONF
cp ADCD_LINUX.CONF ADCD_MAC.CONF
sed -i '' 's/\/home\/ehrocha\/hercules\/images/\/YOUR\/PATH\/HERE/g' ADCD_MAC.CONF
sed -i '' 's/CNSLPORT \{2\}23/CNSLPORT  3270/g' ADCD_MAC.CONF
sed -i '' 's/0E20.2   LCS  10.0.1.20/0E20.2 3088 CTCI \/dev\/tun0 1500 10.10.10.11 10.10.10.12 255.255.255.255/g' ADCD_MAC.CONF
  1. Getting the network to work on Mac OS require some extra steps (skip it if your are using Linux).

Download tuntaposx, uncompress and install the package. No reboot it necessary, you should now have plenty of tun* (and tap*) interfaces:

$ ls /dev/tun*
/dev/tun0 /dev/tun10 /dev/tun12 /dev/tun14 /dev/tun2 /dev/tun4 /dev/tun6 /dev/tun8
/dev/tun1 /dev/tun11 /dev/tun13 /dev/tun15 /dev/tun3 /dev/tun5 /dev/tun7 /dev/tun9
  1. Okay, now we can start the emulator (we need to sudo to access to the tun0 interface, among other reasons):
sudo hercules -f ADCD_MAC.CONF

First of all, checks that the network is fine:

# From Mac OS:
$ ifconfig tun0
tun0: flags=8851<UP,POINTOPOINT,RUNNING,SIMPLEX,MULTICAST> mtu 1500
 inet 10.10.10.12 --> 10.10.10.11 netmask 0xff000000 
 open (pid 98687)

# From Hercules:
herc =====> devlist
[...]
HHC02279I 0:0E20 3088 CTCI 10.10.10.11/10.10.10.12 (tun0) IO[0] open
HHC02279I 0:0E21 3088 CTCI 10.10.10.11/10.10.10.12 (tun0) IO[0] open

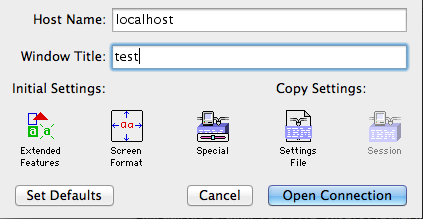
Open tn3270 and connect with default settings on localhost:

tn3270 connection

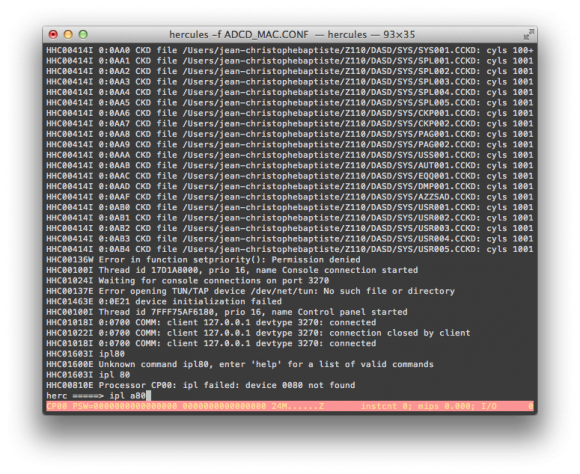
And then in the hercules terminal, enter ipl a80

boot zos

Hercules390 console: booting Z/OS

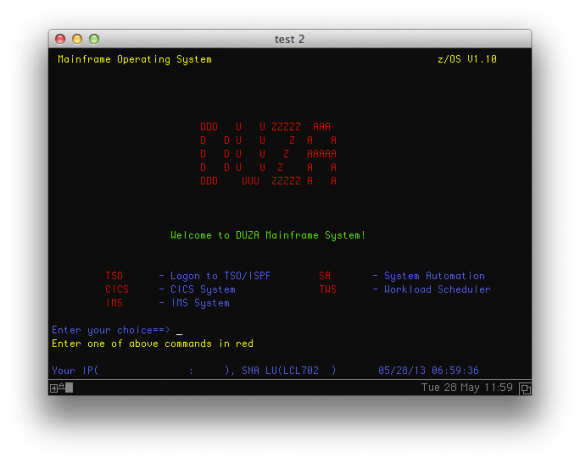
It is very long to boot, don’t worry. You will actually have to use 2 terminals, so open the second one, which will show the logon screen (see screenshot below) after booting is done. It will be used for “userland” aka TSO commands.

The first terminal shall be kept open as the master console, which receive system logs and can be used for “system-level”* commands (e.g root level).

Z/OS "Duza" logon screen

Z/OS “Duza” logon screen

  1. At the prompt, enter TSO, then IBMUSER as the login, and SYS1 as the password. It will automatically launch the ISPF menu:
ISPF menu

ISPF menu

  1. Now, you are good to go ahead with Z/OS commands…

This video demonstrates the boot process:

Z/OS emulation with Hercules390 from phocean on Vimeo.

  1. Now, let’s get the network up.

Prepare Mac OS:

  • Make sure that the Mac OS firewall is deactivated or/and that you configured pf to allow the tun0 interface (another article coming soon on this topic).
  • Add a route to tun0
sudo route add -net 10.10.10.0/24 -interface tun0
  • You may want to activate ip forwarding, to have the Z/OS reach other interfaces through the kernel:
sudo sysctl -w net.inet.ip.forwarding=1

Now every thing is in place to allow the mainframe to reach the outside. Further routing considerations are outside the scope of this article.

Prepare Z/OS:

  • In TSO menu, choose 3 (utilities), 4 (Dslist)
  • Click on the line besides Dsname Level and type-in ADCD and then press [Enter]. ADCD is what is called a dataset.
  • In the Command column, on the left of ADCD.Z110S.PROCLIB, type in e (stands for edit, reproduce the same pattern when I say “edit” in the following steps)
  • Edit the TCPIP member, and make sure that the //PROFILE line looks like this:
//PROFILE DD DISP=SHR,DSN=ADCD.Z110S.TCPPARMS(DUZA)

You could change the DUZA string, but you would have to make sure that the corresponding profile exists in ADCD.Z110S.TCPPARMS (see TODO section).

  • Go back to Dslist page using end or exit as a command. This time, type DUZA as dataset.
  • Edit the TCPARMS member, then PROFILE. Once in the file, edit carefuly the following lines (at the bottom, around line 90):
000090 DEVICE CTCA1 CTC e20
000091 LINK CTC1 CTC 1 CTCA1
000092
000093 HOME
000094    10.10.10.11  CTC1
000095
000096 GATEWAY
000097    10.10.10.12  = CTC1 1492 HOST
000098
000099 DEFAULTNET 10.10.10.12 CTC1 1492 0
[...]
000109 START CTCA1
  • In the console window, restart the network stack:
stop tcpip
# wait for termination message
start tcpip
  • If every is going well, the tunnel should get up and you should be able to ping both side (use the ping command in Z/OS from the command menu).

This video illustrates some of this networking stuff:

Hercules390 and Z/OS, getting the network up from phocean on Vimeo.

Useful commands

  • Ifconfig
netstat home
  • Shutdown
# in "system" terminal:
S SHUTSYS
Z EOD

# then, once finished, in Hercules:
exit

Tips

  • I was stuck at an early moment during the boot process with:
IXC208I THE RESPONSE TO MESSAGE IXC420D IS INCORRECT: IS NOT A VALID 
ACTION 
 IXC420D REPLY I TO INITIALIZE SYSPLEX ADCDPL, OR R TO REINITIALIZE 
XCF.     
  REPLYING I WILL IMPACT OTHER ACTIVE SYSTEMS.

You can go over it by entering this in your terminal session (tn3270):

R 00, I
  • After the long process, I actually had to open a second connection with the terminal to get the logon screen. So, just check from time to time instead of waiting for nothing in front of the first window.
  • To logoff, type X from the ISPF main menu. The first time, you have to configure the printer. Choose LOCAL as print mode, and give it any name as Local printer ID. Then press [Enter], and if you are asked for a sysout class, choose "J". You should be back in TSO, where you can execute logoff. Next time, it will default to these values, so you should get straight from ISPF to TSO.
  • Don’t forget that TSO is a CLI where you can type Z/OS and Unix commands. You actually don’t need or have to use ISPF, so don’t hesitate to use it!

Of course, a good source of information is the hercules390 forum may also be of help.

Voilà, happy hacking! WTF, it seems I got mainframed too! Did you?

Big thanks again to Phil Young for catching our attention on this stuff.

TODO

  • Understand and get rid off the DUZO profile: you probably noticed that we are using the DUZO  profile to load the network stack (which is after the name of the torrent, and does probably more stuff behind). For example, there is no DUZO profile in ADCD.Z110S.TCPPARMS, so I still have no idea how it actually gets loaded. It has been only 2 days that I work on Z/OS, so I still have to read the doc (and any help is welcome).
  • Change the logon screen (see references).

References

Rootkit in my lab? (part II)

I finished checking the RAM with Volatility and… I found nothing. Nada.

It’s a lot of fustration. There must be something just there, but my findings are certainly limited by my skills.

I attach here some of the main outputs of Volatility. As far as I can tell:

  • no evidence of injection or kernel hooking
  • no suspicious process
  • no suspicious driver
  • no suspicious registry entry
  • etc.

Based on my observations, I first tried to narrow my investigations (drivers and hooks) but as I could not find anything, I ended dumping most of Volatility outputs in hope to see something unusual. I also compared them with a fresh Windows XP SP3 install. I extracted keyboard related drivers (keyboard.sys, kbdclass.sys, i8042prt.sys), hashed them, scanned them: there were native. I am less sure on how to deal with the software certificate system, but I did checked all Microsoft and root certificates in the bank along with their signature with a clean system: nothing wrong.

Dear reader, any help or tip is welcomed! Am I missing something obvious? Could it be possibly not a rootkit but some kind of corruption? If so, how to detect it?

Just drop me an e-mail if you want to have a look on the dump itself.

Volatility outputs:

Rootkit in my lab?

Context

For now, I can’t tell much about the context, mainly because it may – or may not – involve other people. The only thing I am interested in is to spot the issue and understand precisely what is going on.

What makes the case really interesting though, is that it occurred on a fresh install of a Windows XP virtual machine. I aimed it to be a clean malware reversing snapshot. I noticed the weired behavior minutes after finishing the system install and setting up a bunch of reversing and live analysis tools.

So I bet that if I got some malware, it probably comes from one of those. At this time, unfortunately, there are too many and I could not spot the exact time, so I can not start the analysis from this angle.

This article is almost written in live, so pardon my mistakes. I will update it as soon as I find something new. Of course, I am really expecting your feedback, suggestions and corrections. I see it as a great opportunity to learn, even though this one may not be the easiest…

Symptoms

Two things alerted me quickly.

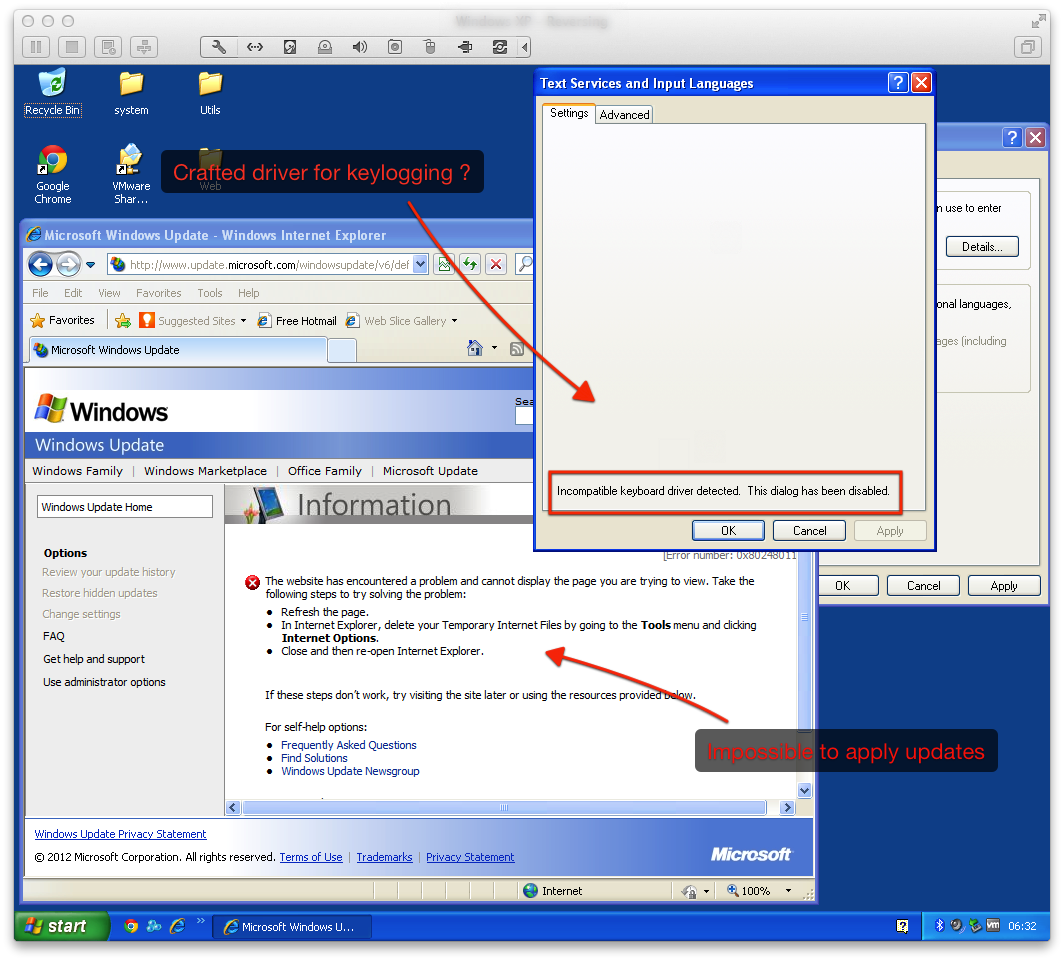
The first one was, at a point, the permanent failure of going through the full windows update process. Believe me, I have tried all ways.

The second one was the weird dialog when trying to access to the keyboard layout settings. It says “Incompatible driver detected“. To me, this looks like there is a keylogger somewhere…

Suspicious activities: the keyboard driver and windows update seem to be messed

Then, as I started to check around, more odd stuff came out.

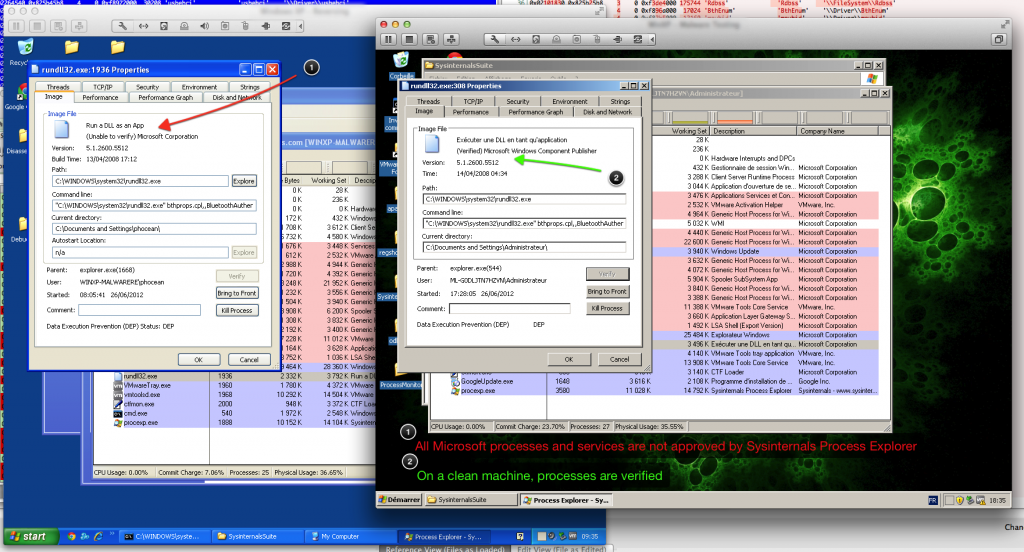
I fired up Process Explorer, and soon realize that it was “unable to verify” the signatures of all the running Windows processes. I could not find anything else suspicious, though (no odd process, memory content looks normal, etc.).

On the left, Process Explorer fails to validate any Windows process.
On the right, expected behavior on a clean system.

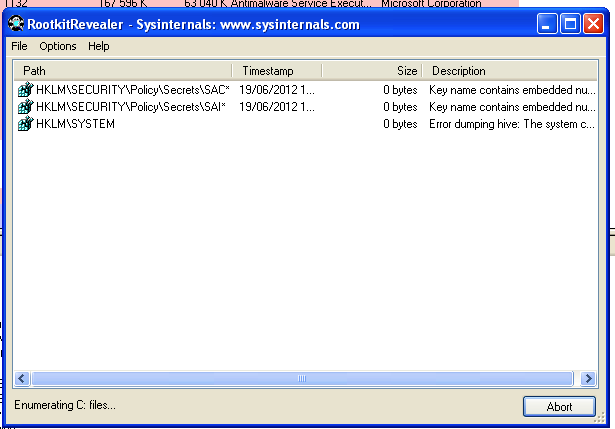
Ok, while I am with the Sysinternal suite, why not scanning with Rootkit Revealer:

Rootkit Revealer cannot access to the SYSTEM hive of the registry

Interesting… and what about GMER:

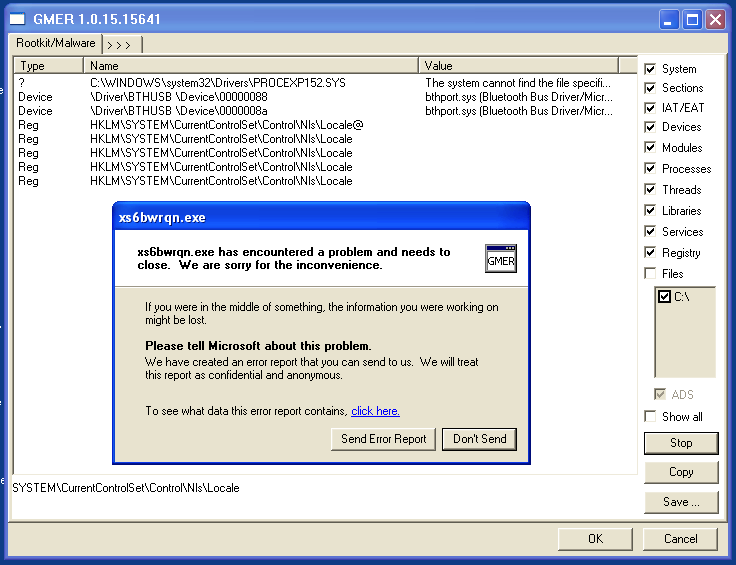
GMER crashes when accessing the registry…

Oops! Now it crashes when it is accessing the registry…

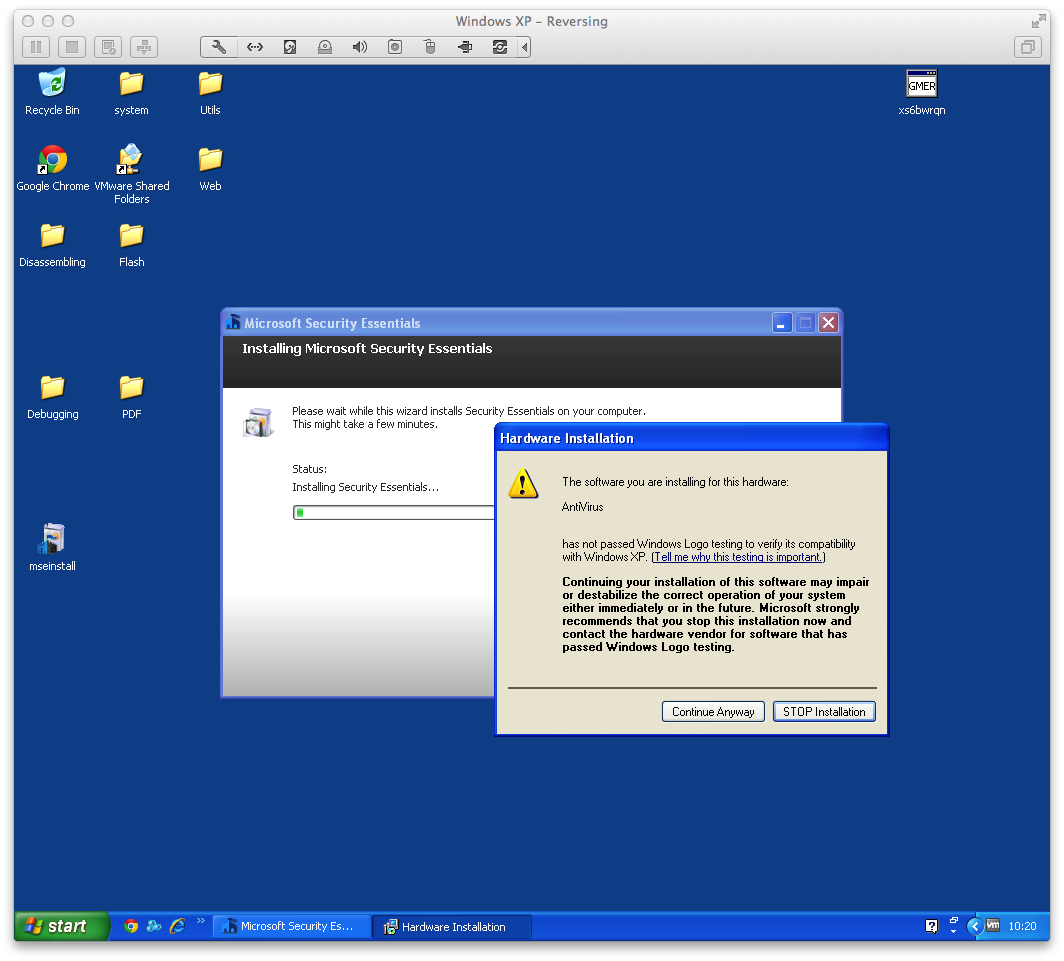
For the fun, let’s see what happens if we try to set up an antivirus (Security Essentials):

Windows certificate warning when installing… Microsoft Security Essentials!!!

Nice one! Very suspicious! Note that after a full scan, Security Essentials reports me that the system is clean and everything is fine. I am so relieved. :)

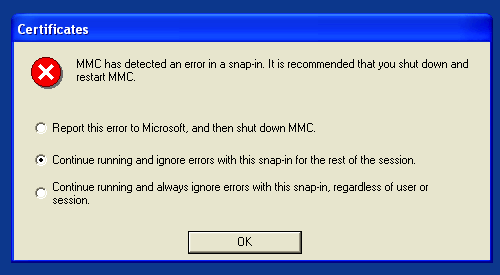
Curious to see how my certificates are, I run certmgr.msc. I compared all Microsoft root certificates with a clean machine and could not see anything different. But again something happened:

certmgr.msc crashes

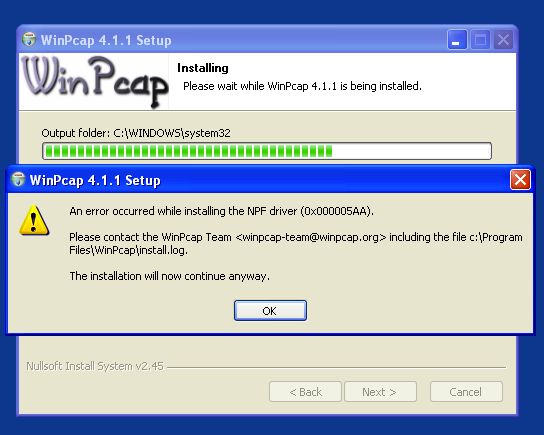
Oh, just one of my last attempts to do live analysis (this the WinPcap setup included with Wireshark):

WinPCAP installation also fails

Ok, so enough played. The thing seems to be nicely done, and live analysis is going to be way too hard and unreliable.

Memory Analysis

This is where I am now. I reverted to a snapshot prior to my live analysis attemps, confirmed the strange behaviors are still observable, and suspended the VM to get the vmem file.

So I have spent the last hours scanning the memory with, of course, Volatility.

So far, I have to confess that I found NOTHING. But analyzing the memory can be a harsh process when it comes to sophisticated threats, and I may have reached the limits of my skills.

But, anyway, I could not dream of a greater and more exciting opportunity to learn!

My discoveries, if there are, will be published in another article.

UPDATE: I forgot to tell that it is a Windows XP SP3 machine, but not fully updated due to the issues.