Category Archives: System

/etc/mtab~ issue at startup

I don’t know how it really happened – probably a VMWare crash that locked my file system, but after a reboot I got this message at startup :

Cannot create link /etc/mtab~
Perhaps there is a stale lock file?

As a result, some of the partitions were not mounted and the system was pretty much broken.

But, no need to panic, just erase all the lock files (be careful not to erase the mtab file itself !) :

$ rm /etc/mtab~*

Now test mounting your partitions to check that you don’t get this message anymore :

$ mount -a

If it is alright, reboot and it should be fine.

openSUSE 11.1

openSUSE 11.1 is out and already on all my desktop PC.

This distribution is, by far, the best Linux environment for a desktop PC : very stable, up to date, polished, professional…

I also appreciate the huges improvements made on Yast and the package management system. Despite being an advanced user that like to use the command line, I reallly appreciate sometimes to have a nice graphical frontend that just do what I want easely and quickly.

openSUSE 11.1 deserves its increasing popularity. Really, give it a try !

VMWare Workstation 6.5

I have just upgraded WMWare from version 6.04 to 6.5, and I have to say that it has very nice new features.

The first surprising thing was the file I downloaded. It is now not anymore a tar.gz archive but a .bundle file.

After downloading, as root, just make it executable or start it with sh :

% sh VMware-Workstation-6.5.0-118166.x86_64.bundle

It now starts a graphic installer, that takes care of everything. All the compilation process is now hidden to the user.

I was expecting the compilation to fail and that I would have to look for a patch to run on my edge Linux kernel. Indeed, I just compiled 2.6.26 kernel (64 bits) a few days ago.

But nothing like that. the process went smoothly.

However, I was still prudent. Even after a compiling, previous versions almost always required some patch to get full networking to work.

So I gave a try and launch one of my virtual machines. Surprise : all worked out of the box !

For the first time, I even did not need any vmware-any-any patch or any network patched vmmon and vmnet modules to get wifi networking operational.

I also quickly noticed some very nice and fancy features :

  • 3D graphics support
  • more devices supported : fingerprint reader device, audio driver for Vista, …
  • a graphical virtual network settings editor : this utility had been for ages on the Windows version and finally will make your easier on Linux

At last, but not least, the Unity display mode.

Though I am not a Mac user, I believe this can be compared to VMWare Fusion. Anyway, it allows you to display the virtual machines programs within your X session.

Look at this screenshot :
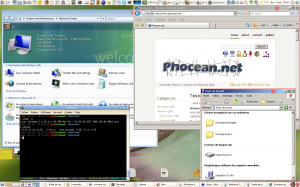
VMWare Workstation 6.5 and Unity

The result is quite spectacular. On my Gnome desktop, I am now able to display some windows from Windows XP and Windows Vista.

Well, this is not yet perfectly smooth or artifact free, but this is already really usable and responsive enough to be used intensively.

Another limit is the operating system support. So far, among my virtual machines, I was able to do it with Windows systems but not Open Solaris for instance.

There must have been more improvements, more or less visible, that I am not aware of. I won’t go for a full review.

I just wanted to insist that if you are a VMWare user,  you really should consider to upgrade for the complete support of the latest kernel and the Unity feature.

It seems that VMWare has listened to the Linux users, or at least is taking it more seriously. Not that they are nice, but the competitors are close (Virtual box, KVM, Xen…) !

Note to myself

When you want to do such a thing as upgrading the BIOS of your Thinkpad, read the instructions that come with the bootable CD flash utility.

If you think you did, read it again –  and do not interpret them.

It would avoid loosing time with a boot error like :

CDR101: not ready reading drive C

That occurs when you choose the CD player as a temporary boot device (Thinkvantage button and then F3), although it is required to really change the boot order within the BIOS menu (F2) and save this setting.

By the way, I really recommend a BIOS update if you are a happy Thinkpad T61 user : not only it fixes numerous issues with the Intel chipset, but it optimizes power management. I noticed that the fan management has been improved. It is most of time slower than before, so the laptop is more silent.

Practicing Cisco networking with GNS3 and Dynamips

GNS3 and Dynamips put together give a nice open-source and free alternative to emulate a network with IOS routers. Dynampis is an emulator of Cisco 7200 router, while GNS3 provides a nice graphical environment to design your network and use the virtual routers.

I sometimes use Boson Netsim, which is not only non-free but not so reliable.

However, as I just started to use GNS3 and Dynamips, I don’t know it so well yet and won’t compare any further the two solutions.

On this page, I am just summarizing the few steps to set it up on your Linux system.

First, set up the prerequisite :

$ aptitude install python-qt4

Now, go to gns3.net and download the source code for Linux (direct link).

You may extract the archive in your local application folder :

$ wget http://pfe.epitech.net/frs/download.php/819/GNS3-0.5-src.tar.gz
$ tar -xzvf GNS3-0.5-src.tar.gz -C /opt

Then, you need the dynamips binary from the dynamips blog (direct links for x86 or amd64 platforms).
The file must be executable.

$ wget http://www.ipflow.utc.fr/dynamips/dynamips-0.2.8-RC2-amd64.bin
$ chmod u+x dynamips*.bin
$ mv dynamips-0.2.8-RC2-amd64.bin /opt

Now, start GNS3 :

$ /opt/GNS3-0.5-src/gns3

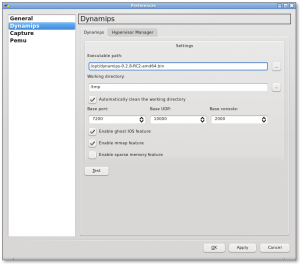
In the edit menu, select preferences and go the dynamips section.

Just browse to the dynamips binary you dowloaded, to fill the value of the executable path field.

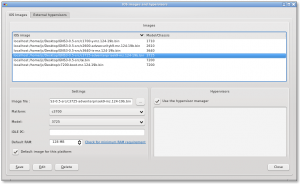
Still from the edit menu, select IOS images and hypervisors. There, you have to add all the IOS images you want to use, one after another. Normally, the default settings for each file loaded are suitable.

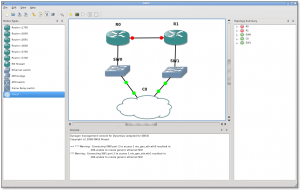
Back to the main window, you can drag and drop routers and link them, creating the topology you wish.

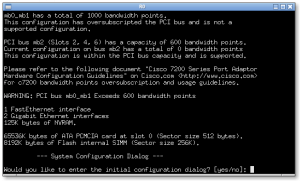
For now, just add one router. Right click on it and select start to start it up. Right click again and select console.

Enjoy ! Of course, I strongly recommand that you start reading further from this page.

Resources :

http://www.ipflow.utc.fr/blog/
http://www.gns3.net/
http://www.blindhog.net/tutorials/gns3-linux-install/gns3-linux-install.html