Category Archives: System

My goodness, I got mainframed!

Mainframes are not dead, why not pentesting it?

I just watched the presentation of Phil Young at Shmoocon 2013: “Mainframed: the secrets inside that black box“. I truly loved it. I thought mainframes where disappearing, but I was surprised to see that it still alive. I was even more surprised to find out that they have some Unix interface, and that there is a emulator for x86. Where it was less of a surprise is that their security is pretty low :-)

Anyway, don’t miss watching the video. Phil’s blog, “Soldier of Fortran”, is also a gold mine, he wrote many tips, tutos and tools.

It made me very curious and just in case I find some IBM Z/OS during a pentest, I though it would be nice to run it.

Installing

Disclaimer:

Although some Z/OS files are available for download on the Internet, you must own a legal license of Z/OS. This tutorial is exclusively for education-purpose, use it only for testing, never in production nor for illegal activities.

Also, I am a noob in the area. So if some of you are skilled and find mistakes or improvements, please let me know in the comments. I give a great importance to your feedback and it encourages me to continue.

I glued the pieces in the following steps (Mac OS oriented and tested only with it, the same should work for Linux with minor adjustments and see the reference otherwise):

  1. Download and install tn3270 (Mac) or x3270 (Windows, Linux, Mac): this will be the client terminal used to connect to the mainframe.
  2. Download the emulator, Hercules. Install it, following the README instructions relevant to your system. Note that the instructions for Mac OS are outdated and won’t work. I followed Phil’s instructions:
git clone git://github.com/s390guy/hercules-390.git
cd hercules-390
sh autogen.sh
./configure
make
make install
  1. Take some IBM Z/OS release, and install it:
mv IBM\ ZOS\ 1.10/Z110SA/images/Z110\ -\ Copy /YOUR/PATH/HERE/Z110
cd /YOUR/PATH/HERE/Z110
mkdir PRTR
cd CONF
cp ADCD_LINUX.CONF ADCD_MAC.CONF
sed -i '' 's/\/home\/ehrocha\/hercules\/images/\/YOUR\/PATH\/HERE/g' ADCD_MAC.CONF
sed -i '' 's/CNSLPORT \{2\}23/CNSLPORT  3270/g' ADCD_MAC.CONF
sed -i '' 's/0E20.2   LCS  10.0.1.20/0E20.2 3088 CTCI \/dev\/tun0 1500 10.10.10.11 10.10.10.12 255.255.255.255/g' ADCD_MAC.CONF
  1. Getting the network to work on Mac OS require some extra steps (skip it if your are using Linux).

Download tuntaposx, uncompress and install the package. No reboot it necessary, you should now have plenty of tun* (and tap*) interfaces:

$ ls /dev/tun*
/dev/tun0 /dev/tun10 /dev/tun12 /dev/tun14 /dev/tun2 /dev/tun4 /dev/tun6 /dev/tun8
/dev/tun1 /dev/tun11 /dev/tun13 /dev/tun15 /dev/tun3 /dev/tun5 /dev/tun7 /dev/tun9
  1. Okay, now we can start the emulator (we need to sudo to access to the tun0 interface, among other reasons):
sudo hercules -f ADCD_MAC.CONF

First of all, checks that the network is fine:

# From Mac OS:
$ ifconfig tun0
tun0: flags=8851<UP,POINTOPOINT,RUNNING,SIMPLEX,MULTICAST> mtu 1500
 inet 10.10.10.12 --> 10.10.10.11 netmask 0xff000000 
 open (pid 98687)

# From Hercules:
herc =====> devlist
[...]
HHC02279I 0:0E20 3088 CTCI 10.10.10.11/10.10.10.12 (tun0) IO[0] open
HHC02279I 0:0E21 3088 CTCI 10.10.10.11/10.10.10.12 (tun0) IO[0] open

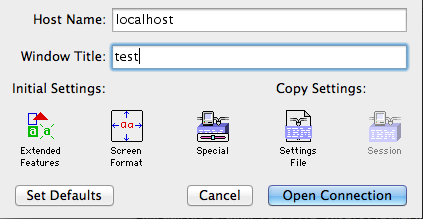
Open tn3270 and connect with default settings on localhost:

tn3270 connection

And then in the hercules terminal, enter ipl a80

boot zos

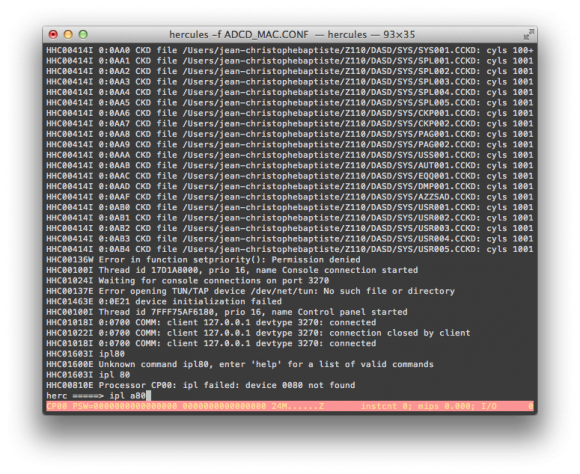
Hercules390 console: booting Z/OS

It is very long to boot, don’t worry. You will actually have to use 2 terminals, so open the second one, which will show the logon screen (see screenshot below) after booting is done. It will be used for “userland” aka TSO commands.

The first terminal shall be kept open as the master console, which receive system logs and can be used for “system-level”* commands (e.g root level).

Z/OS "Duza" logon screen

Z/OS “Duza” logon screen

  1. At the prompt, enter TSO, then IBMUSER as the login, and SYS1 as the password. It will automatically launch the ISPF menu:
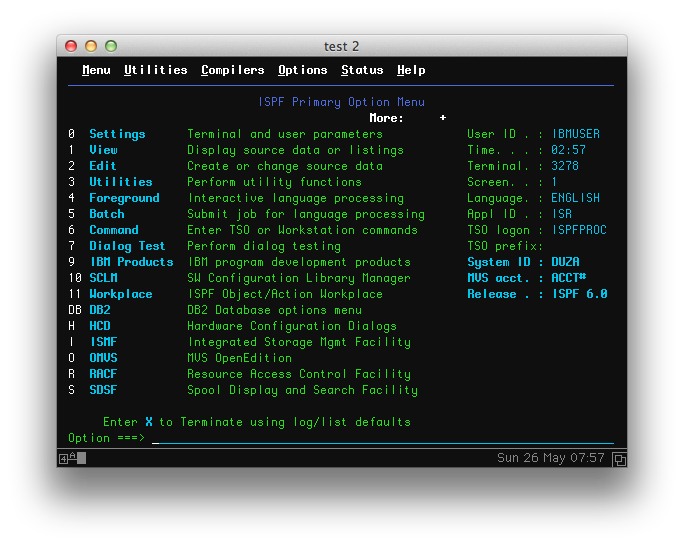
ISPF menu

ISPF menu

  1. Now, you are good to go ahead with Z/OS commands…

This video demonstrates the boot process:

Z/OS emulation with Hercules390 from phocean on Vimeo.

  1. Now, let’s get the network up.

Prepare Mac OS:

  • Make sure that the Mac OS firewall is deactivated or/and that you configured pf to allow the tun0 interface (another article coming soon on this topic).
  • Add a route to tun0
sudo route add -net 10.10.10.0/24 -interface tun0
  • You may want to activate ip forwarding, to have the Z/OS reach other interfaces through the kernel:
sudo sysctl -w net.inet.ip.forwarding=1

Now every thing is in place to allow the mainframe to reach the outside. Further routing considerations are outside the scope of this article.

Prepare Z/OS:

  • In TSO menu, choose 3 (utilities), 4 (Dslist)
  • Click on the line besides Dsname Level and type-in ADCD and then press [Enter]. ADCD is what is called a dataset.
  • In the Command column, on the left of ADCD.Z110S.PROCLIB, type in e (stands for edit, reproduce the same pattern when I say “edit” in the following steps)
  • Edit the TCPIP member, and make sure that the //PROFILE line looks like this:
//PROFILE DD DISP=SHR,DSN=ADCD.Z110S.TCPPARMS(DUZA)

You could change the DUZA string, but you would have to make sure that the corresponding profile exists in ADCD.Z110S.TCPPARMS (see TODO section).

  • Go back to Dslist page using end or exit as a command. This time, type DUZA as dataset.
  • Edit the TCPARMS member, then PROFILE. Once in the file, edit carefuly the following lines (at the bottom, around line 90):
000090 DEVICE CTCA1 CTC e20
000091 LINK CTC1 CTC 1 CTCA1
000092
000093 HOME
000094    10.10.10.11  CTC1
000095
000096 GATEWAY
000097    10.10.10.12  = CTC1 1492 HOST
000098
000099 DEFAULTNET 10.10.10.12 CTC1 1492 0
[...]
000109 START CTCA1
  • In the console window, restart the network stack:
stop tcpip
# wait for termination message
start tcpip
  • If every is going well, the tunnel should get up and you should be able to ping both side (use the ping command in Z/OS from the command menu).

This video illustrates some of this networking stuff:

Hercules390 and Z/OS, getting the network up from phocean on Vimeo.

Useful commands

  • Ifconfig
netstat home
  • Shutdown
# in "system" terminal:
S SHUTSYS
Z EOD

# then, once finished, in Hercules:
exit

Tips

  • I was stuck at an early moment during the boot process with:
IXC208I THE RESPONSE TO MESSAGE IXC420D IS INCORRECT: IS NOT A VALID 
ACTION 
 IXC420D REPLY I TO INITIALIZE SYSPLEX ADCDPL, OR R TO REINITIALIZE 
XCF.     
  REPLYING I WILL IMPACT OTHER ACTIVE SYSTEMS.

You can go over it by entering this in your terminal session (tn3270):

R 00, I
  • After the long process, I actually had to open a second connection with the terminal to get the logon screen. So, just check from time to time instead of waiting for nothing in front of the first window.
  • To logoff, type X from the ISPF main menu. The first time, you have to configure the printer. Choose LOCAL as print mode, and give it any name as Local printer ID. Then press [Enter], and if you are asked for a sysout class, choose "J". You should be back in TSO, where you can execute logoff. Next time, it will default to these values, so you should get straight from ISPF to TSO.
  • Don’t forget that TSO is a CLI where you can type Z/OS and Unix commands. You actually don’t need or have to use ISPF, so don’t hesitate to use it!

Of course, a good source of information is the hercules390 forum may also be of help.

Voilà, happy hacking! WTF, it seems I got mainframed too! Did you?

Big thanks again to Phil Young for catching our attention on this stuff.

TODO

  • Understand and get rid off the DUZO profile: you probably noticed that we are using the DUZO  profile to load the network stack (which is after the name of the torrent, and does probably more stuff behind). For example, there is no DUZO profile in ADCD.Z110S.TCPPARMS, so I still have no idea how it actually gets loaded. It has been only 2 days that I work on Z/OS, so I still have to read the doc (and any help is welcome).
  • Change the logon screen (see references).

References

Installing Metasploit on Mac OS X [Mountain Lion]

It happened to me a little more complex than expected, so I thought it would deserve a post. There are a few good tutorials already, but they actually did not work flawlessly for me. So while this post is mostly based on them, there are some slight differences.

Getting Metasploit

First, let’s fetch Metasploit. Adjust the last two lines by replacing .zshrc (I am using Zsh) with .bash_profile if you are using Bash, for instance.

This will download, create symlinks and set the database settings path (we will come back on it later) in your environment:

cd /usr/local/share/
git clone https://github.com/rapid7/metasploit-framework.git
cd metasploit-framework
for MSF in $(ls msf*); do ln -s /usr/local/share/metasploit-framework/$MSF /usr/local/bin/$MSF;done
ln -s /usr/local/share/metasploit-framework/armitage /usr/local/bin/armitage
echo export MSF_DATABASE_CONFIG=/usr/local/share/metasploit-framework/config/database.yml >> ~/.zshrc
source ~/.zshrc

Metasploit is almost ready, but don’t run anything yet. There a still quite a few steps…

Getting Postgres

We use Homebrew:

brew install postgresql --without-ossp-build

Initialization stuff:

initdb /usr/local/var/postgres

To have launchd start postgresql at login:

ln -sfv /usr/local/opt/postgresql/*.plist ~/Library/LaunchAgents

But I prefer to keep my startup clean, so I added two aliases in my .zshrc

alias pg_start='pg_ctl -D /usr/local/var/postgres -l /usr/local/var/postgres/server.log start'
alias pg_stop='pg_ctl stop'

So you now have two commands, pg_start and pg_stop, to use for Metasploit.
Finally, we create the msf user that will connect to the database from within Metasploit:

createuser msf -P -h localhost  
createdb -O msf msf -h localhost 

While we are at the database stuff, let’s configure Metasploit to use it. Create a database.yml file in  /usr/local/share/metasploit-framework/config/ and put these lines:

production:
    adapter: postgresql
    database: msf
    username: msf
    password: <password>
    host: 127.0.0.1
    port: 5432
    pool: 75
    timeout: 5

The database is ready!

Getting Ruby

The last big step is to install Ruby. The one provided by Mac Os is a little too old, and you don’t want to mess with system libraries, so let’s leave it untouched. You could install Ruby with Homebrew, but it happens that the latest version (2.0.0-p0) is not working with Metasploit (OpenSSL libraries conflicts). So we need to use something like the 1.9.3 version of Ruby.

Anyway, a good practice is to have some flexibility on the version you are going to use, so you would be able to switch between 1.9.3, 2.0.0 or whatever and that whenever you need.

Here comes rbenv. For the next steps, I will assume that you have a working homebrew setting.

Let’s go:

brew install rbenv ruby-build

Add this line to your .zshrc or bash_profile:

eval "$(rbenv init -)"

Now you should be able to list all installable versions of Ruby:

rbenv install --list

Let’s pick up 1.9.3:

rbenv install 1.9.3-p392

It takes a while, but after it is completed, you can set it as your default:

rbenv rehash
rbenv global 1.9.3-p392

Note that you could use the local command instead of global to set it for the current terminal only.

Let’s check that everything is correctly set. This is where the Ruby versions are stored:

$ ls ~/.rbenv/versions/
1.9.3-p392 2.0.0-p0

ruby and gem MUST point to the 1.9.3 version:

$ rbenv which ruby
$HOME/.rbenv/versions/1.9.3-p392/bin/ruby
$ rbenv which gem
$HOME/.rbenv/versions/1.9.3-p392/bin/gem

Looks good, let’s go ahead.

We are now able to install up the required gems for Metasploit. They made it easy by packaging these in a Gemfile that can be read by the “bundle” utility:

gem install bundle
cd /usr/local/share/metasploit-framework
rbenv rehash
bundle install

Final steps

Create an vncviewer wrapper to facilitate use from within Metasploit:

echo '#!/usr/bin/env bash'  >> /usr/local/bin/vncviewer   
echo open vnc://\$1 >> /usr/local/bin/vncviewer  
chmod +x /usr/local/bin/vncviewer

Get and compile the pcaprub library (optional):

cd /usr/local/share/metasploit-framework/external
git clone http://github.com/shadowbq/pcaprub.git
cd ./ext/pcaprub
ruby extconf.rb && make && make install

Have fun!

If you haven’t, don’t forget to start Postgres, and you are ready to play:

sudo -E msfconsole

It should deploy the database structure and then start to work without warning. Hurrah! That was not hard, but a bit long, wasn’t it?

In case it still fails for you, it means that something went wrong with the setup. Check the steps again, and then leave a comment as it may be the time for an update or a correction of this article.

Credits

As stated in the introduction, this article is mostly taken from darkoperator.com with minor adjustments (it actually did not work out of the box for me), so the use of rbenv. I hope it will be helpful to other people in the same case as me.

UPDATE 09/07/2013:

  • change in pcaprub directory (./pcaprub –> ./ext/pcaprub)

UPDATE 07/23/2013:

  • add missing rbenv rehash command (thanks @amukofes)
  • add missing commands to retrieve pcaprub (thanks @Ton)
  • fix indentation in postgres config file

CVE-2009-3555: Safari, fix reached Mountain Lion…

I haven’t investigated much (and I will not more), but since my upgrade to Mac OS 10.8 (Mountain Lion), Safari supports safe renegociation.

Meanwhile, I had received a laconic answer from Apple to my bug report saying that they “are aware of this issue”.

Note that Safari 6.0 on Lion did not (at least on my computer, if someone could confirm)… so same browser version, different OS, the system SSL library must have been – silently – updated.

Anyway, good move finally.

Rootkit in my lab? (Part III)

First, thanks for all the comments in the previous articles (Part I and Part II).

I decided to analyze one the crash I experienced during registry analysis.
I could reproduce all the time a BSOD with Regshot. I thought it would be nice to see what I could get with WinDBG.

I had my environment set up with the suspicious VM configured to debug activated on the serial port, which is a simple pipe on Mac OS X.
Another VM is configured with a serial port as the other end of this pipe, and WinDBG attached to it.
Another method would be to just configure Windows to create a crashdump file with kernel symbols, that you can later load into WinDBG. Of course, the first method offers more opportunities to check and play with the live system.

Then, I just boot the target and trigger the crash, simply by starting a scan with Regshot:

Windows then crashes, WinDBG catches the exception and stops.

So what do we have ?

First, the error type, PAGE_FAULT_IN_NONPAGED_AREA (50), means that an instruction pointed to an invalid memory address. Let’s check this.

With !analyse -v, you get the full error dump.

Crashing Instruction

It shows the function (nt!CmpGetValueKeyFromCache, offset 0x89) and the memory address where the crash was triggered.

The instruction at this address is:

80637807 f3a5 rep movs dword ptr es:[edi],dword ptr [esi]

This instruction is trying to copy 8 bytes at the address pointed by EDI.
EDI has the value of 0xe1285050 at execution time.

And what do we have at this memory location ?

EDI pointing to invalid memory section

Nothing indeed. Note that this corruption persists at every boot.

So what can we conclude?
We can certainly exclude hardware failure, because it is a virtual machine and because the corruption always occur at the same memory region, even after a reboot.
At least, I can now be sure that something in the kernel is definitely corrupted.

Could it be a rootkit trick? Still the question remains, but to me it now looks very, very suspicious. Some rootkit code, poorly written, could have sat in this non-paged memory area and been paged out, causing the BSOD. I have not much knowledge about it at this time but I am going to search on this. At least, I now have good starting point to look at.

That’s all for today, folks. I wrote it while I am still working on it, so sorry if it looks rough and incomplete. It is sort of live, thoughts are still in process.

Again, I am looking forward to reading your comments and suggestions. (Hopefully) there will be a part IV!

Rootkit in my lab? (part II)

I finished checking the RAM with Volatility and… I found nothing. Nada.

It’s a lot of fustration. There must be something just there, but my findings are certainly limited by my skills.

I attach here some of the main outputs of Volatility. As far as I can tell:

  • no evidence of injection or kernel hooking
  • no suspicious process
  • no suspicious driver
  • no suspicious registry entry
  • etc.

Based on my observations, I first tried to narrow my investigations (drivers and hooks) but as I could not find anything, I ended dumping most of Volatility outputs in hope to see something unusual. I also compared them with a fresh Windows XP SP3 install. I extracted keyboard related drivers (keyboard.sys, kbdclass.sys, i8042prt.sys), hashed them, scanned them: there were native. I am less sure on how to deal with the software certificate system, but I did checked all Microsoft and root certificates in the bank along with their signature with a clean system: nothing wrong.

Dear reader, any help or tip is welcomed! Am I missing something obvious? Could it be possibly not a rootkit but some kind of corruption? If so, how to detect it?

Just drop me an e-mail if you want to have a look on the dump itself.

Volatility outputs:

Rootkit in my lab?

Context

For now, I can’t tell much about the context, mainly because it may – or may not – involve other people. The only thing I am interested in is to spot the issue and understand precisely what is going on.

What makes the case really interesting though, is that it occurred on a fresh install of a Windows XP virtual machine. I aimed it to be a clean malware reversing snapshot. I noticed the weired behavior minutes after finishing the system install and setting up a bunch of reversing and live analysis tools.

So I bet that if I got some malware, it probably comes from one of those. At this time, unfortunately, there are too many and I could not spot the exact time, so I can not start the analysis from this angle.

This article is almost written in live, so pardon my mistakes. I will update it as soon as I find something new. Of course, I am really expecting your feedback, suggestions and corrections. I see it as a great opportunity to learn, even though this one may not be the easiest…

Symptoms

Two things alerted me quickly.

The first one was, at a point, the permanent failure of going through the full windows update process. Believe me, I have tried all ways.

The second one was the weird dialog when trying to access to the keyboard layout settings. It says “Incompatible driver detected“. To me, this looks like there is a keylogger somewhere…

Suspicious activities: the keyboard driver and windows update seem to be messed

Then, as I started to check around, more odd stuff came out.

I fired up Process Explorer, and soon realize that it was “unable to verify” the signatures of all the running Windows processes. I could not find anything else suspicious, though (no odd process, memory content looks normal, etc.).

On the left, Process Explorer fails to validate any Windows process.
On the right, expected behavior on a clean system.

Ok, while I am with the Sysinternal suite, why not scanning with Rootkit Revealer:

Rootkit Revealer cannot access to the SYSTEM hive of the registry

Interesting… and what about GMER:

GMER crashes when accessing the registry…

Oops! Now it crashes when it is accessing the registry…

For the fun, let’s see what happens if we try to set up an antivirus (Security Essentials):

Windows certificate warning when installing… Microsoft Security Essentials!!!

Nice one! Very suspicious! Note that after a full scan, Security Essentials reports me that the system is clean and everything is fine. I am so relieved. :)

Curious to see how my certificates are, I run certmgr.msc. I compared all Microsoft root certificates with a clean machine and could not see anything different. But again something happened:

certmgr.msc crashes

Oh, just one of my last attempts to do live analysis (this the WinPcap setup included with Wireshark):

WinPCAP installation also fails

Ok, so enough played. The thing seems to be nicely done, and live analysis is going to be way too hard and unreliable.

Memory Analysis

This is where I am now. I reverted to a snapshot prior to my live analysis attemps, confirmed the strange behaviors are still observable, and suspended the VM to get the vmem file.

So I have spent the last hours scanning the memory with, of course, Volatility.

So far, I have to confess that I found NOTHING. But analyzing the memory can be a harsh process when it comes to sophisticated threats, and I may have reached the limits of my skills.

But, anyway, I could not dream of a greater and more exciting opportunity to learn!

My discoveries, if there are, will be published in another article.

UPDATE: I forgot to tell that it is a Windows XP SP3 machine, but not fully updated due to the issues.